

ZARA HAUL SUMMER 2020: Huge Zara Try On Haul & Reviews
Summer 2020 Zara Try On Haul and Review for Zara Basics and items that are New In Zara for the summer right now. I include try on clips plus detailed reviews about items that worked and didn't work. See how I styled some of the pieces and how everything looks.
ZARA HAUL SUMMER 2020: Huge Zara Try On Haul & Reviews
Summer 2020 Zara Try On Haul and Review for Zara Basics and items that are New In Zara for the summer right now. I include try on clips plus detailed reviews about items that worked and didn't work. See how I styled some of the pieces and how everything looks. This video can be especially helpful for anyone who is petite like me! All of my measurements and items are shown below.
Products Mentioned
My Measurements: Height - 5ft // Bust - 32C // Waist - 25-26 inches // Hips 36-37 inches
ZARA ITEMS SHOWN IN ORDER:
Draped Print Dress (Pink/Mauve - XS): https://go.magik.ly/ml/z7bv/
Strappy Denim Dress (Blue - S): https://go.magik.ly/ml/z7c4/
Strappy Denim Dress (Black - S): https://go.magik.ly/ml/z7c5/
Knotted Mini City Bag (Black): https://go.magik.ly/ml/z7c6/
Knotted Pareo Skirt (Ecru - XS): https://go.magik.ly/ml/z7c9/
Corset Top (Oyster White - XS): https://go.magik.ly/ml/z7ca/
Pleated Palazzo Pants (Vanilla - XS): https://go.magik.ly/ml/z7cb/
Black Denim Jacket (mine is sold out--here is alternative): https://go.magik.ly/ml/z7ci/
Ribbed Crop Top (Sand - S): https://go.magik.ly/ml/z7cl/
Ribbed Crop Top (Black - S): https://go.magik.ly/ml/z7cl/
Denim Shirt TRF (White - XS): https://go.magik.ly/ml/z7cp/
Satin Cropped Top (Ecru - S): https://go.magik.ly/ml/z7cr/
Combination Tulle Bodysuit (Beige Pink - S): https://go.magik.ly/ml/z7ct/
Cropped Top TRF (Black - S): https://go.magik.ly/ml/z7cv/
Ribbed Knit Skirt (mine is sold out--here is alternative): https://go.magik.ly/ml/z7cw/
Knit Top (Fuchsia - XS): https://go.magik.ly/ml/z7cx/
Dotted Mesh Crop Top (Ecru - XS): https://go.magik.ly/ml/z7cy/
Sequin Bustier Top (Gold/Silver - S): https://go.magik.ly/ml/z7cz/
White Crop Top (no longer available)
Ribbed T-Shirt (Brown, Black, & White - S): https://go.magik.ly/ml/z7d0/
Ribbed Bodysuit (White & Black - S): https://go.magik.ly/ml/z7d1/
Sweetheart Neckline Bodysuit (Black - XS): https://go.magik.ly/ml/z7d2/
Animal Print Mini Dress (Leopard - XS): https://go.magik.ly/ml/z7d3/
Fitted Dress TRF (White - S): https://go.magik.ly/ml/z7d4/
Mini Dress With Slit (Black - XS): https://go.magik.ly/ml/z7d5/
OTHER ITEMS SHOWN:
Top I'm Wearing--Miss Lola Paris Night Out Top (Nude - S): https://www.misslola.com/products/paris-night-out-top-nude
H&M Nude Strappy Sandals (Light Brown - 5.5): https://go.magik.ly/ml/z7by/
Gold Necklace 1: https://go.magik.ly/ml/z7bz/
Gold Necklace 2: https://go.magik.ly/ml/z7c3/
Gola Coaster High Sneakers (Off White - 6): https://go.magik.ly/ml/z7c7/
Levi's 501 Original Womens Short (Wise Up Black - 25): https://go.magik.ly/ml/z7co/
Aritzia TNA Atmosphere Short (White - S): https://go.magik.ly/ml/z7cq/
Levi's Vintage Shortalls (Eat My Shorts Medium Wash - XS): https://go.magik.ly/ml/z7cs/
Urban Outfitters BDG High-Waisted Girlfriend Jean (Light Wash - 27): https://go.magik.ly/ml/z7cu/
Similar Posts For You


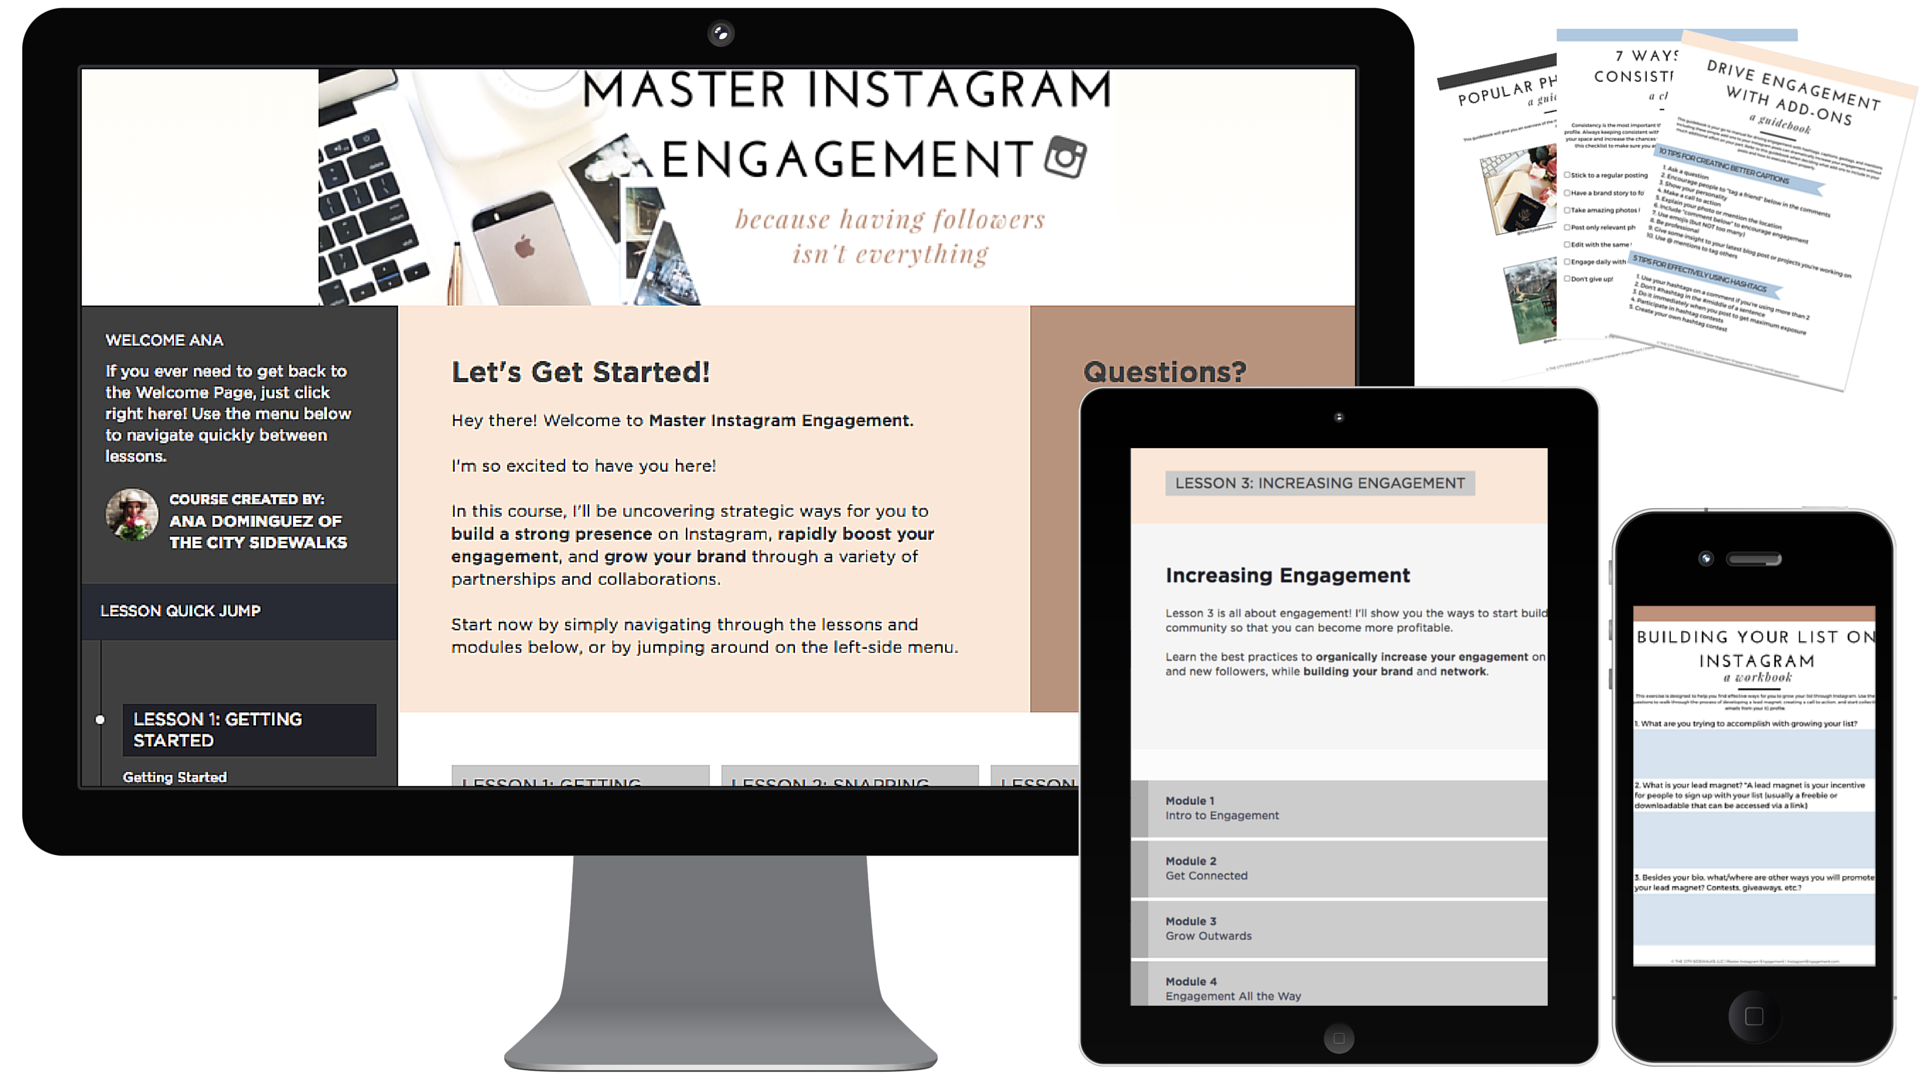
Natural Glowy Summer Makeup Tutorial
This is one of my favorite summer glowy makeup looks. I wanted something simple that I could put on that still made me look put together. I like going without foundation during the summer, so I use mostly glow or cream products to do my whole face. It is really easy to do and lasts me all day! Enjoy!
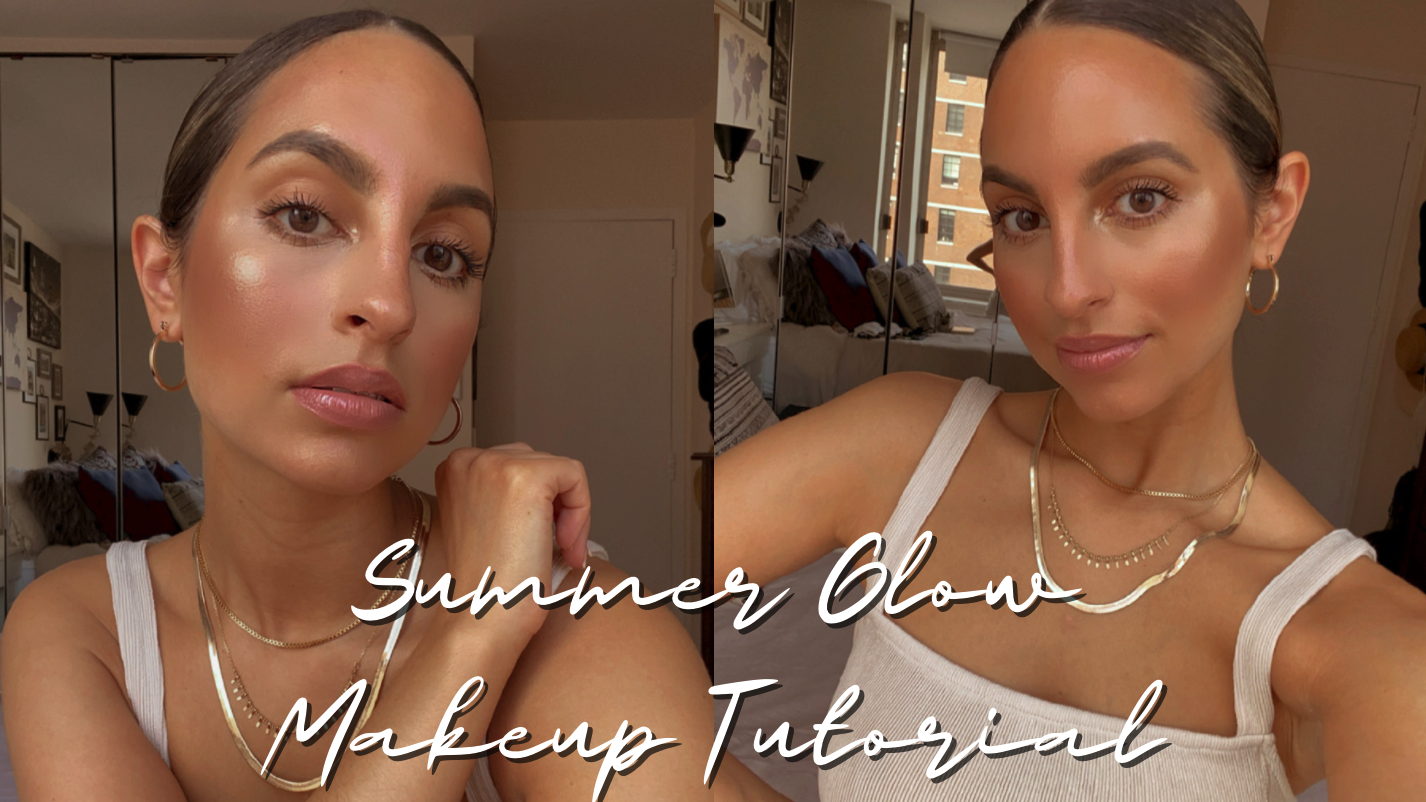
Natural Glowy Summer Makeup Tutorial
This is one of my favorite summer glowy makeup looks. I wanted something simple that I could put on that still made me look put together. I like going without foundation during the summer, so I use mostly glow or cream products to do my whole face. It is really easy to do and lasts me all day! All products I used are linked below. Enjoy!
Products Mentioned

Glossier Future Dew

Tarte Shape Tape

Charlotte Tilbury Contour Wand (Fair/Medium)
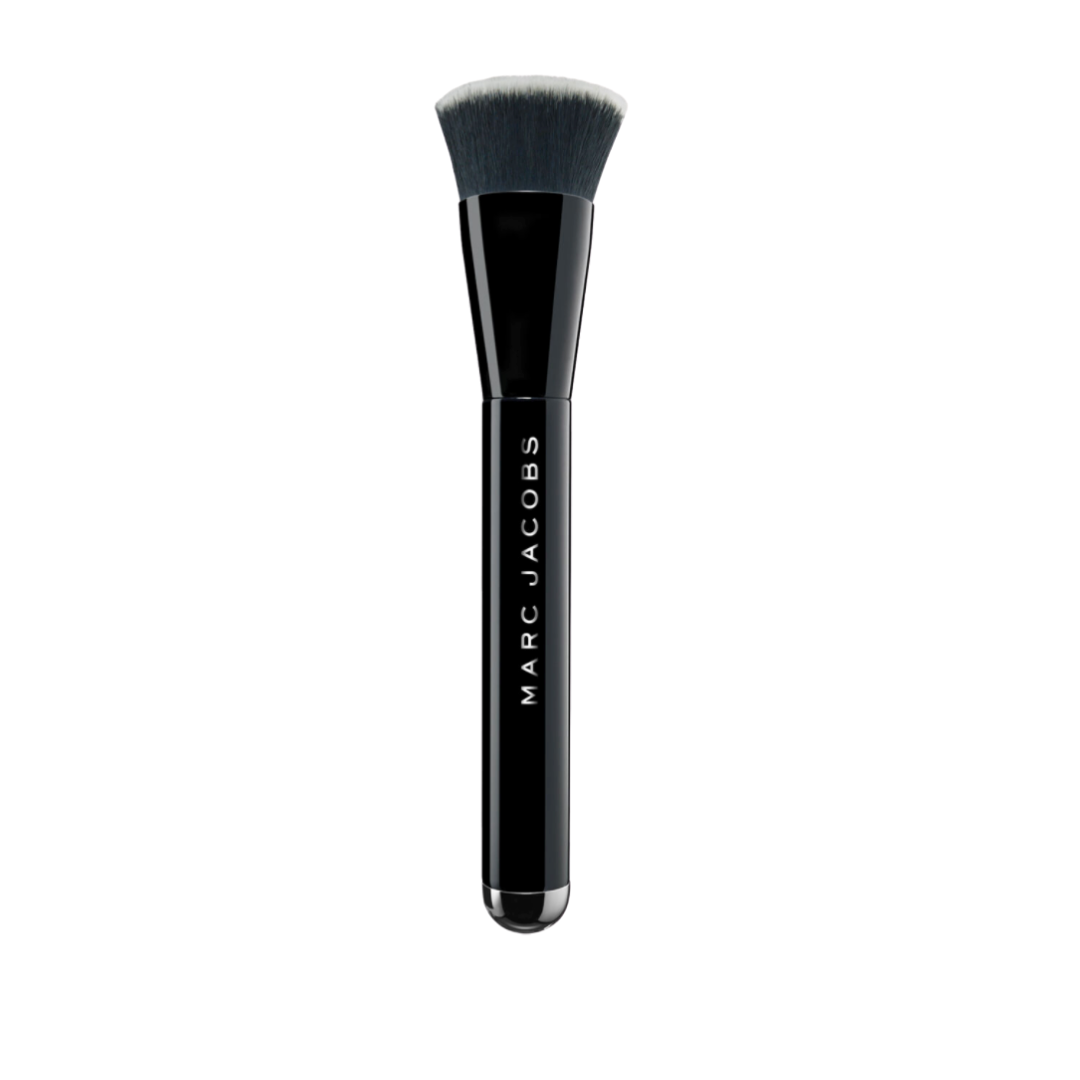
Marc Jacobs "The Shape" Brush

Morphe Blush Palette 8w

Japonesque Kumadori Contour/Highlighting Brush

Dose of Colors Desi x Katy Highlighter (Fuego)

Ecotools Controlled Setting Brush (in the Prep & Refresh Kit)

Hourglass Arch Brow Sculpting Pencil (Soft Brunette & Dark Brunette)

Glossier Boy Brow (Brown)

Shiseido Eyelash Curler

L'oreal Paris Voluminous False Fiber Lashes Mascara

Urban Decay All Nighter Setting Spray

Charlotte Tilbury Lip Cheat Lip Liner (Pillow Talk)

Fenty Beauty Gloss Bomb ($weetmouth)
What are some of your favorite glowy beauty products? Comment below with more ideas or tips to inspire others!
Similar Posts For You

20 Travel Photography Tips to Start Taking Better Travel Photos
Have you taken a look at your travel photography skills to see where you can improve? If you've ever wondered how to take amazing photos of your vacations, use this post as your guide. Uncover 20 travel photography tips to start taking better travel photos on your next trip!
20 Travel Photography Tips to Start Taking Better Travel Photos
In today's digital age, travel photography is climbing the ranks as a top photography skill to have. People rely heavily on Instagram and other social media outlets to showcase their life and travels. Are you putting your best foot forward to stand out from the crowd? Use this post to uncover 20 travel photography tips to start taking better travel photos on your next trip!

Before Your Trip:
1. Know Your Camera
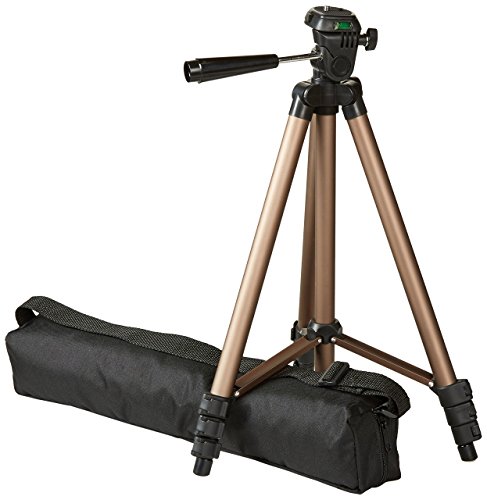
Spoiler Alert: You don't need an expensive professional camera to take great travel photos. With advancements in smartphone technology, the cameras on our phones are taking better and better photos to the point where you sometimes can't even tell the difference. That being said, if you do have a great DSLR, Mirrorless, or Point and Shoot Camera, get to know it as best as you can. Any time I get a new gadget, I really love watching YouTube tutorials to learn all the ins and outs of it.
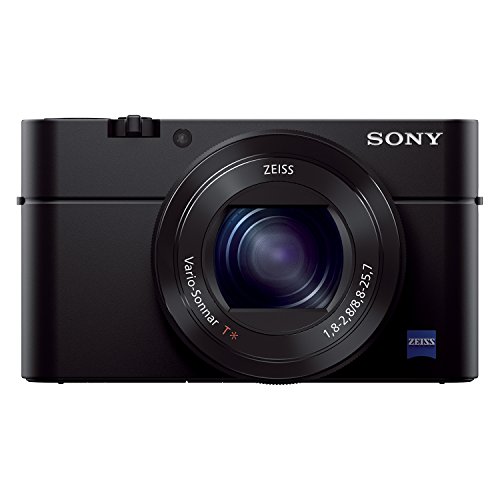
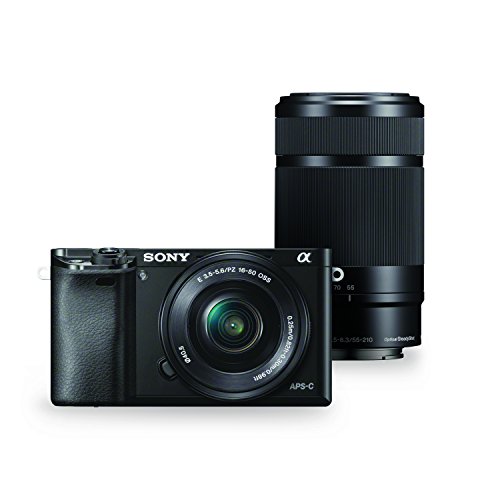
The cameras that I recommend most for travel photography are the Sony RX100 MIII (great for on-the-go and vlogging) and the Sony a6000 (perfect substitute/replacement for the clunky DSLRs). There are tons of other accessories and gear that I recommend right here in the TCS Travel Shop.
2. Research Places You Want to See (Use Pinterest, Instagram, Google, Friends/Family)
If you fail to plan, you plan to fail. That sounds a little aggressive... I'm not saying you need a detailed minute-by-minute itinerary, but a general idea never hurt! Research a little bit ahead of time so you know some of the places you want to check out around your destination. My favorite tools to use for this are Pinterest, Instagram, Google, and just asking friends and family members for recommendations. Pinterest and Instagram can especially be a gold mine for beautiful photo locations since they are image heavy platforms. You can easily save your findings in both the platforms too!

3. Use Google Maps to Mark Your Spots
Once you have an idea of the places you might want to photograph, use a tool like Google Maps to plot them out. Doing this is a great way to plan a route of attack for all the places you want to see. You'll be able to estimate a transportation route and see how close/far each of your locations are from one another. I particularly love the "SAVE" feature on Google Maps that allows me to put a star or flag on a location that I want to remember.
4. Pack Wisely and Comfortably
First rule of traveling is to always travel as light as possible. You don't want to be lugging around heavy bags of camera equipment when you're on the go, so make sure to only pack the necessities. If for some reason you do need a ton of camera equipment (maybe you're shooting video in addition to your traditional still shots?), opt for a comfortable carrying case/backpack that will make it easier on your body. Don't forget comfortable shoes to walk around in as well! Check the TCS Travel Shop for my favorite things!
When You Arrive:
5. Get Up Early to Beat the Tourists
Nothing great ever comes easy. If you want truly stunning photos (and some pretty lighting), make sure to rise early to beat the tourists. If you're going to a hot spot--like the Brooklyn Bridge or Eiffel Tower--the earlier you arrive, the more likely you are to get a picture without hundreds of tourists crowding the photo. Plus, you'll avoid the harsh sunlight that usually starts to hit around late morning and early afternoon.

6. Stay Out Late to Beat the Tourists
But, if getting up early just really isn't your thing, consider staying out later into the evening when everyone else is wrapping up their evening. Evening shots and cityscapes can look really cool at dusk if you have the right camera equipment!
7. Have Patience
The key to capturing those unforgettable photos of popular landmarks, sites, or destinations is having patience. Trust me--I get it. I know how frustrating it can be to be crammed in with a bunch of annoying tourists who are taking up all the space in the area by taking photos with their gigantic iPads (PLEASE, SOMEONE TELL ME WHY OBNOXIOUS TOURISTS LOVE THIS SO MUCH?!?!). But if you just wait a couple of minutes, usually they will go away and the space will clear up for you. Have patience to get the right shot and angle because it will pay off!
8. Use Different Angles
Get creative with the angles and focus of your photos! An unexpected and unique perspective can be the difference between a good photo and a remarkable one. Take a step back, to the side, to the corner, to the front... Work all the angles!

9. Explore a Little
In case you didn't know, you don't always have to stick to the map. Sometimes the best discoveries are places that you didn't even know were on the map to begin with! If a side street looks enticing to you, explore it. If you see a cozy restaurant with amazing interior decor, stop in for a coffee or treat. I feel like it's always these unexpected places that we end up remember the most anyways!
General Photography Rules:
10. Use the Rule of Thirds
This well-known photography rule still holds true. When in doubt, make sure you're using the rule of thirds to set up your photo.
11. Play Around with Composition
Don't get too hung up on the rules of photography though. Play around with the composition of your photo. Put the subject in the middle, on the side, at the top, etc. See what works with different angles!

12. Fill the Frame AND Use the Frame
Find unique ways to fill your photo (i.e. don't have too much open space in the foreground if it's not necessary) or create a frame for the subject that you are photographing. This can be done by taking a good look at the surroundings of your subject before you shoot. Look through your viewfinder and try to find some hidden gems that will make your picture stand out!
13. Use Your Eyes to See Details
Before you step away from a shot, have a quick glance around to make sure you didn't miss anything. Maybe there's a charming little flower arrangement on the table at a cafe that would make the perfect accent to the photo. Or maybe the details on the door next to the building you were looking at has a really unique and intricate design. Make sure you don't miss out on these little things!

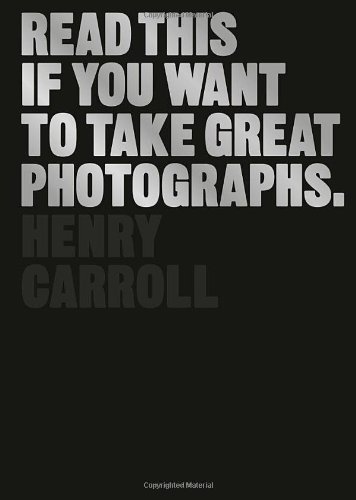
14. Have Awesome Editing Tools to Help Emphasize the Beauty
Editing is where the magic really happens. I'm not saying you have to go out and purchase thousands of dollars of editing software right now, but investing a little bit can certainly help. I use Adobe’s Creative Cloud Lightroom Photography Plan, which has been a game changer, and it’s only $9.99/month. To really kick things up a notch, I purchased and installed these 'Dreamy Presets' Lightroom Presets so that I can beautifully and effortlessly edit all of my photos with the click of a button. If you want to try them out, you can even use my discount code “THECITYSIDEWALKS10” for 10% off your order! I personally love the New York, Los Angeles, and Santorini presets.
15. Crop Your Photos
A good crop job can be the defining factor to a really amazing photo. When you're editing your photos, be on the lookout for angles and areas that you can crop out to really make the subject in the photo stand out. The foreground and sides are usually good places to start.
Bonus Tips to Remember:
16. Practice
As with any skill, the more you keep at it, the faster you'll improve. Practice taking photos as much as you can! You'll eventually start to learn and see what works vs. what doesn't. And don't get hard on yourself at first--the skill will develop the more you work on it!

17. Put the Camera Down...
This might be one of the most important tips (if not THE most important tip) on this list. Although this entire article is about how to take better travel photos, you need to remember to put the camera down once in awhile to be present in the moment and really appreciate where you are. I once met a woman who said that when she travels, she never puts her camera down and just looks at the pictures when she gets home. How depressing is that?! You're traveling to see and experience a place, so you should probably do exactly that! Put your camera down and be present to take in the moment.
18. ...But Keep it With You
That being said, you should always make sure you have a camera accessible in case something comes up that you want to capture! This is pretty easy nowadays since we have cameras on our phones and our phones are attached to our bodies. But having a small point and shoot camera never hurt either. I personally love my Sony RX 100 III as a backup to my iPhone camera.

19. Be Wise with Your Hotel Choice (if that's an option)
If you're flexible with your hotel choice and budget, it might not be a bad idea to pick one that is centrally located or one that has an awesome balcony/view! It's a convenient way to be able to take some cool shots of the city.
20. Always Have Backup
The worst thing that could happen for your photography is getting stuck with a dead battery, lost photos, or a full memory card. ALWAYS bring these things with you when you travel:
Extra Batteries
Extra Power or Charging Cords
Extra Chargers
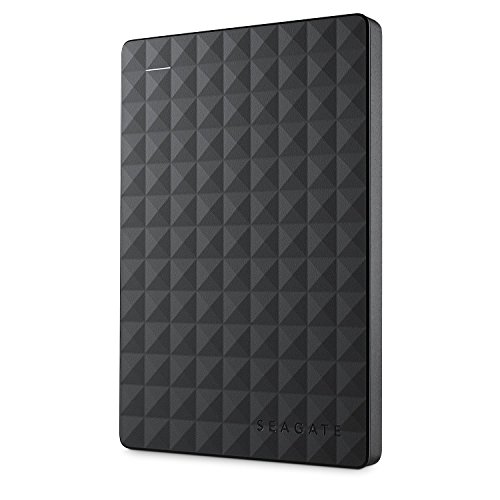
An External Hard Drive
Extra Memory Cards
A Convenient Case to Carry Everything
The TCS Travel Shop has all my best recommendations for these products!
What are other travel photography tips you use to take great travel photos? Comment below with more pointers!
Shop this post


This page may include affiliate links, which comes at absolutely no cost to you. As an affiliate partner to such websites, including Amazon Associates, I earn from qualifying purchases. All opinions are my own.
Similar Posts For YOu

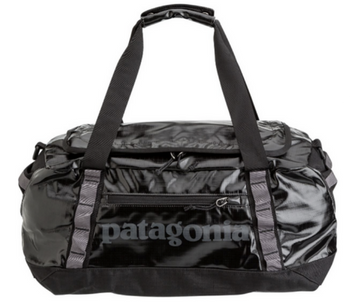
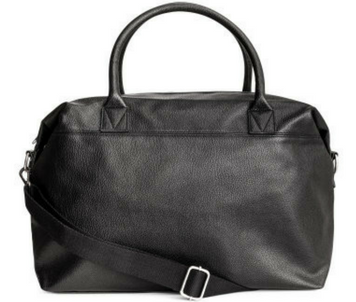
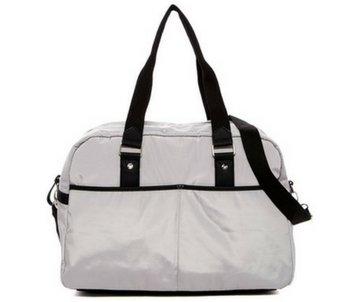
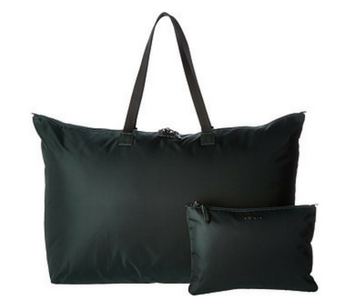
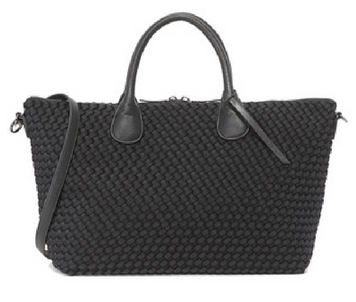
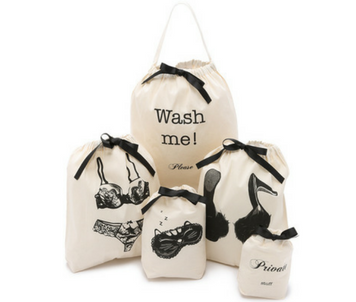
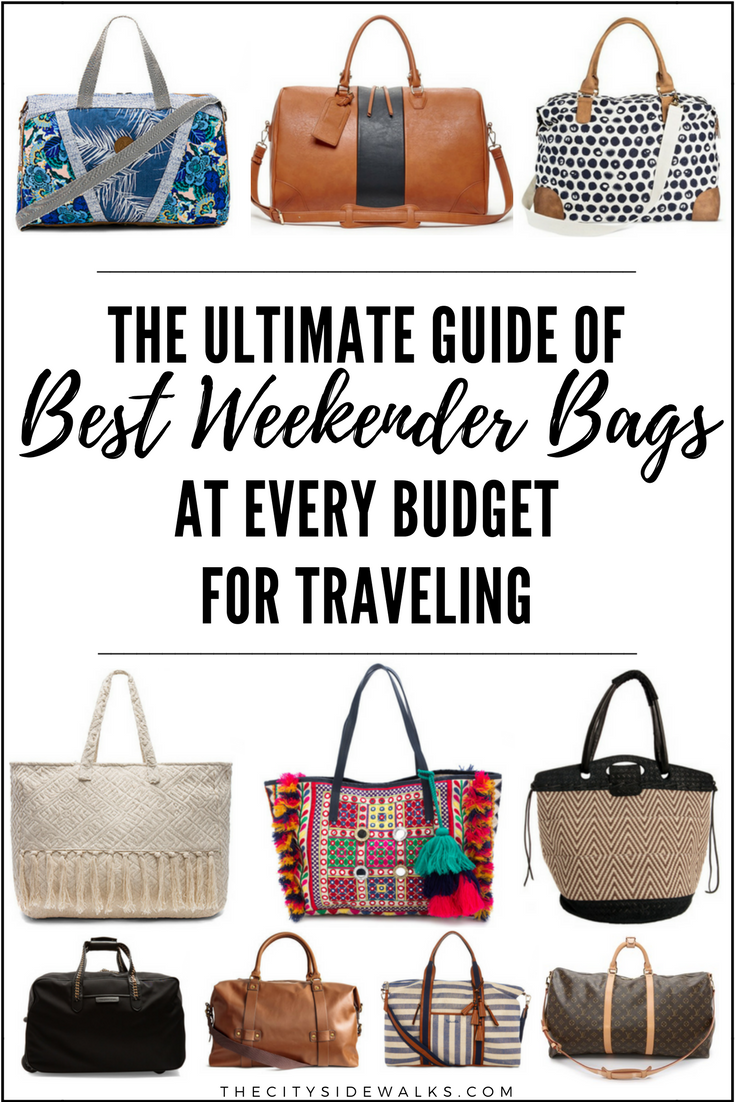
The Ultimate Guide of Best Weekender Bags at Every Budget for Travel
The best accessory for a weekend getaway (besides some statement sunnies and your camera) is a chic, reliable weekender bag. But your travel bag doesn't need to break the bank--there are great styles at every budget! Shop these weekender bags at every budget for travel to find the best one for your upcoming trip!
The Ultimate Guide of Best Weekender Bags at Every Budget for Travel
Budget Friendly: Under $75


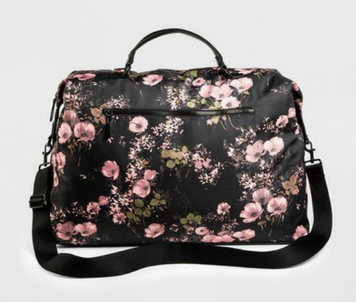


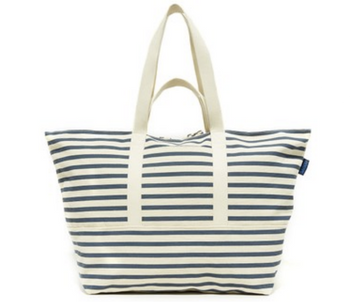


Moderate: $75-200


Luxury: $200-400


Splurge Worthy: $400+


BONUS: Extra Accessories You Need in Your Bag


Want to browse more travel gear and accessories? Head to the TCS Travel Shop right now!
Disclosure: Please be aware that prices and availability of products listed are subject to change at any time due to retailer demand and availability. Every item in this post is a product that I personally use and/or highly recommend to TCS readers. This page may include affiliate links, which comes at absolutely no cost to you. As an affiliate partner to such websites, including Amazon Associates, I earn from qualifying purchases. All opinions are my own.
Similar Posts for You

10 Steps to Create a Successful Travel Blog
If you've been thinking about starting a travel blog or looking for ways that you can start to take your blog more seriously, check out this guide with the 10 steps you need to create a successful travel blog. We've included over 20 resources and bonus materials in here, which is perfect for the ambitious travel + lifestyle blogger! Uncover how to find your voice as a blogger, how to create a blog business plan, the best cameras and courses for bloggers, and other tips to keep you motivated!
10 Steps to Create a Successful Travel Blog
“Oh, don’t bother starting a blog now. The market is wayyyy too saturated and it’s impossible to be successful at this stage in the game. The only people who are successful are the ones who started way back when.”
“Blogs are so over. They had their moment; but now, nobody pays attention to blogs anymore.”
“Why would you even bother blogging? It’s so time consuming and unrewarding.”
Have you heard any of these things before?
I sure have.
In fact, these are all things people have said to me at some point along my blogging career. And one of the statements above is actually an exact quote from an ex when I told him I was starting this blog. HA!
Unfortunately, we live in a society where some people tend to belittle, discourage, or undermine the success of others. There are just some people who can’t stand to see other people happy or excited for wanting to pursue their dreams or passions. They try to impose their own self-limiting behaviors and beliefs on you so that you won’t reach your full potential. They’ll do anything they can to make sure that you stay on the path of mediocrity.
But like DJ Khaled always says, we should never listen to “THEY.” We can learn to turn that noise down, stick to our guns, and pursue those passions anyway! I kinda think that’s the beauty in success after all—when someone tells you, “You can’t,” and you just say, “WATCH ME,” and make it happen. I love it!

I remember reading somewhere that 90-some percent of blogs created don’t make it to their 1-year anniversary. It’s been almost 3 years of blogging for me as I’m writing this (which I can’t even believe) and I’ve learned so much over the course of that time. I’ve made a ton of mistakes, dealt with personal anxieties and fears, and have ultimately come out the other end stronger.
Since many readers ask me how I’ve done it, I want to share some of those strategies with you today. If you’re a blogger—aspiring, new, or even veteran—and you’re wondering how you can create a successful travel blog (or maybe you’re just feeling stuck and need some inspiration), this article is for you. *Scroll to the bottom to find all the resources used in this post!
1. Start Your Blog
Well, this one is pretty obvious. But you can’t really have a successful travel blog if you don’t have a blog to begin with. If you need help on starting your travel or lifestyle blog, just follow these 5 simple steps that I’ve outlined here. For less than a cup of coffee at Starbucks, you can get your blog started in under an hour (and get a free website domain) with Bluehost, which I go over in my tutorial, or HostGator.
There are tons of blogging platforms available these days (WordPress, Squarespace, Wix, Weebly, etc.), but I would suggest either WordPress or Squarespace. I’ve personally used both, and you can even see my comparison of the two right below.
RELATED: How to Start a Travel Blog; WordPress vs. Squarespace
2. Write: Be vulnerable, Develop your voice, and provide a new perspective
The best way to become a successful blogger is to actually use your blog. WRITE! But don’t just write fluff for the sake of hitting “PUBLISH.” Write about something you’re passionate about. There’s a huge difference in writing about something you're passionate about versus something that you feel meh about.
Proof? When I was growing up, I LOATHED English and writing class. For real. If you went back in time and told my 16-year old self that I was going to grow up and make a living from writing, I would laugh in your face. I NEVER thought this would be where my life would end up. But as it turns out, it’s pretty effortless for me to pump out an article about traveling to some destination that I swoon over, or to be vulnerable and give advice in article about my fear of flying.
Which brings me to my next point...
When you’re writing, try to be vulnerable. Be yourself. Let your readers get to know the real you. This is how you’re going to get people to connect with you and how you will start to develop your voice as a writer. If you can find a way to write how you talk or inject your personality into your posts someway, I promise you that it will make a massive difference.
Also, try to find ways that you can provide your readers with a new perspective. Tell or show them something that other people haven’t or aren’t already doing. That’s going to be your secret sauce to success, my friend. (PS—this doesn’t have to be rocket science. YOUR perspective as YOU is sometimes something different enough. Use that!)
*BONUS: Research a little before you write your articles. See the information that people are actually searching for so you can provide the answers. Tools like Google Keyword Planner are great for bloggers because you can see the absolute best ways to name your blog posts based on what people are searching for.

3. Run Your Blog Like a Business
Want to know the difference between regular bloggers and successful bloggers? The successful bloggers actually treat their blog(s) like a business. They have plans with actionable steps, deadlines, and goals. They know that every post has to have meaning or substance behind it and they aren’t just posting to shout out into the void.
If you want to seriously take your blog to the next level, you need to start treating it like a business—business plan and all! Sure, you can skip this step if you want to take the easy route; but I guarantee that you’ll be a lot better suited if you go through the steps of actually sitting down and writing a plan instead of winging it. If you’re not sure how to create a blog business plan, just head to my Free Resource Library to download your own PDF copy.
RELATED: 10 Common Blogging Mistakes You Should Avoid if You Want to Turn Your Blog Into a Business
4. Invest in Your Business: Equipment, E-courses, and Mentoring
If you’re actually serious about treating your blog like a business, you’re going to have to make some investments. But trust me—the investments will reap plenty of rewards down the line.
I’m not only talking about the cost of your hosting service or mail provider. I’m talking about learning investments, photography equipment, and even mentorships or masterminds with other bloggers/entrepreneurs.
EQUIPMENT
If you’re a travel blogger, your blog’s success will tend to rely heavily on your photography skills. It’s your JOB to promote destinations and the things to do there, so you have to have beautiful photos that resonate with that message. I mean, when was the last time you saw a shitty photo of a destination on Instagram and thought, “I can’t wait to go there”? Never. It will turn you off. So don’t do that to your readers.
Invest in quality camera equipment. The cameras that I recommend most for travel blogging are the Sony RX100 MIII ($698, great for on-the-go and vlogging) and the Sony a6000 ($698, perfect substitute/replacement for the clunky DSLRs). There are tons of other accessories and gear that I recommend right here in the TCS Travel Shop. And whatever you do, DON’T FORGET TO GET YOURSELF AN EXTERNAL HARD DRIVE TO BACK EVERYTHING UP!
In terms of photography editing equipment, I highly recommend upgrading your editing software to something more professional like Adobe Lightroom or Photoshop. I use Adobe’s Creative Cloud Lightroom Photography Plan, which has been a game changer, and it’s only $9.99/month. To really kick things up a notch (and to make them a helluva lot easier), I purchased and installed these 'Dreamy Presets' Lightroom Presets so that I can beautifully and effortlessly edit all of my photos with the click of a button. If you want to try them out—which I wholly suggest—you can even use my discount code “THECITYSIDEWALKS10” for 10% off your order! I personally love the New York, Los Angeles, and Santorini presets.
E-COURSES
In the last 3 years of blogging, I’ve invested at least $1000 into e-Courses. The benefits? I’ve learned way more in the few hours, days, or weeks it took me to complete those courses than I could have in years. It sped up the learning time and grew my business like no other. It even inspired me to create my own e-Course (with another one coming soon!).
My 3 favorite e-Courses for travel bloggers are Travel Blog Success, Melyssa Griffin’s Pinfinite Growth, and Melyssa Griffin’s List Surge. I back them up 100% and recommend them to everyone. You can even watch Melyssa's Pinterest Webinar for FREE to see if it's a good fit for you.
MENTORSHIPS OR MASTERMINDS
My wise father has always said to me, “I’m not smart; I’m just old and I know a lot of shit because I’ve experienced a lot of shit.” Duly noted, pops.
But he has a point... People who have been around and experienced things tend to know more about them. And who better to learn from than someone who has already gone through what you’re about to go through?
This is one reason why I put so much emphasis on the value of mentoring and/or mastermind groups. There’s something so great about learning something without having to go through the hardships and mistakes yourself. It’s like another version of time travel if you think about it.
If you have the opportunity to work with a mentor or join a mastermind, do it! Chances are that you will make back your investment 10 times over and walk away with a different, fresh perspective on your business. I even offer 1-on-1 mentorships for my readers, which is one of my favorite parts of this job! I truly love helping others and working together to get those creative, successful juices flowing. (PS—if you want to sign up to work with me, just head right here!)

5. Connect with Others: Your readers, fellow bloggers, and potential readers
The best way to grow your blog is to get out of your comfort zone and connect with others. Thanks to social media, you can easily do this while lounging on your couch in your sweatpants. Use social media to read and respond to comments from your followers/readers, engage with other bloggers or travel enthusiasts by liking/commenting on their content, and even discover new potential readers by finding users who are using similar hashtags or posting similar content.
Obviously, there are ways to really kick it up a notch and get face-to-face with your readers or other bloggers. You could host meet-ups with your readers (a popular tactic used by many travel bloggers), or you could even collaborate with other bloggers in a variety of ways and agree to promote each other’s content. Just get creative and think outside the box!
6. Ignore the Haters
You’ll know you’ve made it when you start to get some haters coming through. It’s inevitable. Remember what I said at the beginning of this post, though? Don’t let “THEY” bring you down!
If you happen to get an off-putting comment or some negativity thrown your way, just ignore it. Don’t invest your time or energy into people who sit behind a computer screen and try to ruin your positive vibes.
The more positive energy you put out into the world, the more you will get back. So brush it off, delete it, have a laugh, and move on. You’re better than them anyways ;)
7. Always be Growing and Test New Strategies
As a business owner, you should always be looking for ways to expand your reach and continue growing. HINT: This is where having a business plan really comes into play. You should always have a vision of where you are and where you want to go so you can create a plan of attack for how you’re going to get there.
The best time to start to expanding and growing your business is when you feel like you’ve plateaued. It’s perfectly fine to reach a place where you feel comfortable and live in that for a moment, but if you really want to continue growing and building your empire, you have to keep moving forward.
Try to be on the lookout for new strategies on how you can improve and grow. Maybe it’s revamping old content to give it a fresh perspective. Maybe it’s adding in an additional stream of revenue, like an e-Course or e-Book. Maybe it’s implementing a new tool to streamline your business or simplify things (like Tailwind or BoardBooster for Pinterest—hello life savers! BTW those links will give you a free month of each service!).
The key here is to pick one thing, tool, or project at a time and dive into that one thing until you see it to completion.
I once worked with someone who was obsessed with finding new tools and systems to use to improve their business, which, in theory, seems like a good thing. However, the 2 biggest mistakes that caused them to be unsuccessful were that they were looking for tools to fix problems that didn’t exist (or weren’t a big impact on the business) and that they never focused on one thing/project at a time. So what happened? Absolutely nothing got done. There was no impact on the business and they were always struggling to prioritize the profitable projects that would actually move their business in a positive direction. Don’t be like this.
*TIP: Use the 3 P's ---> PRIORITIZE PROFITABLE PROJECTS and see them to completion. Organize one thing at a time!
8. Know Your Analytics = Know Your Value
I’ll admit, when I first started blogging, I paid zero attention to my stats. I never looked at Google Analytics. I never looked at my month-over-month growth. I never even bothered to look at where I was receiving the biggest return on my investments. Like Julia Roberts once said, “Big mistake—HUGE!”
If your goal is to start working with brands at some point, knowing your analytics is the only way that you’re going to know your value. If you want to start pitching the big brands, they are going to want to know how you stand out from the crowd. How are you going to know this if you don’t even know who your audience is, where they are coming from, or what their favorite content on your blog is?
If you haven’t already signed up for Google Analytics, do it now. It’s free, easy, and absolutely crucial to your success as a blogger. Take time every day, week, or month to look at your stats and understand them. Look to see your demographic information, where your readers are coming from, and their behavior while visiting your blog.
The single best tool on this platform is the data about which of your blog posts/pages are viewed most. If you’re logged into Google Analytics, you can find this under Behavior > Site Content > All Pages. This page is basically your golden map to the kind of content you should be creating more of. For me, my most popular posts are my City Guides. They each receive thousands of hits a month and this clues me into the fact that I need to be making more City Guides!
The more you get to know your analytics, the better chance you have at negotiating partnerships with brands. Know your engagement, your monthly UV’s + page views, and the demographics of your readers. It will give you a huge leg up if you understand these facts and can properly convey them to your potential partners.
*BONUS: If you want an idea of how much you should be charging for partnerships based on your stats, there’s a guide for that in my Free Resource Library!
9. Start Monetizing from the Beginning
I get an email in my inbox at least once a week from readers asking me how long they need to wait before they start monetizing their blog. My answer? Do it now.
Seriously! There is no secret sauce or rule to when or how long you should be waiting until you can begin to monetize your blog. I know this is soooo contradictory to what tons of other “veteran” bloggers might say, but I’m not them. Start now because the sooner you do it, the sooner you’ll be making money.
There is no reason why you can't begin to try and monetize from the beginning. The easiest and quickest way to do this is to join an affiliate program that pays you a commission for recommending a company’s products or services.
The first affiliate program I ever joined was the Amazon Affiliate Program, which I’m still part of today. But, I’ll be honest here: I didn’t see my first commission check from Amazon (which required you to have $100 threshold before they paid you) until maybe almost a year after I joined. However, once I hit that threshold, my traffic was also simultaneously growing, so it was easier for me to reach that $100 mark much quicker. Now, I receive a check from Amazon at least every other month or so. It might not be a lot, but it’s passive income that I’m making without doing anything, which is AWESOME.
You can also start to monetize by joining other affiliate programs (like ShareASale or CJ), or by creating your own digital products, such as e-Books or e-Courses. You can use a service like GetDPD to sell them effortlessly and digitally. Plus, they have a built in affiliate program so you can even bring on affiliates of your own to help you sell more!
*Bonus: In addition to monetizing your blog from the beginning, I highly recommend starting an email list to grow from the beginning. This is where you have the potential to really hit it out of the park with monetizing. I learned all of my tricks from Melyssa Griffin’s List Surge, which I highly recommend.

10. GET OUT & TRAVEL!
I hope this one is a no-brainer. If you want to be a successful travel blogger, you’re going to have to travel! Get out there, have adventures, get into predicaments, and make unforgettable memories. Do and experience things that are out of your comfort zone! These are the beautiful moments that you’re going to be able to share with your audience.
But don’t get caught up in the idea that you have to be on the road 24/7 to travel, unless that’s what you want. You can just as easily write a travel blog by experiencing things that happen around your community, city, state, or province.
The point is you should do what makes you happy and whatever ignites your soul. All of that energy will come through in your content and make your readers happy.
BONUS 1: Be Patient
Having a successful travel blog takes time. It never happens overnight. It takes a lot of work, time, and dedication. Be patient with it.
I’ll also throw in that no two blogs are the same. Don’t get caught up in the moment of comparing yourself to another blogger who is on a totally different journey than you. Don’t compare your success to their success or it will throw you into a downward spiral. Trust me, I’ve been there/done that. Be patient. There is room at the top for everybody and your time will come!
BONUS 2: Take Time for YOU
Raise your hand if you’ve ever felt burned out before? *AGGRESSIVELY RAISES BOTH HANDS*
November 2016 was the beginning of a really tough time for me. I had just moved to a new city and away from a life and people that I loved. I moved in with my boyfriend and I had a whole bunch of other life changing things take over. On top of that, I never properly dealt with the emotions of all these things happening at once.
For months, I felt stuck. I had all these emotions bottled up inside of me and I didn’t know what to do with them or who to turn to for guidance. I realized that I was forgetting to do one major thing that could pull me out of this: I wasn’t taking care of myself. I wasn’t working out like I used to. I wasn’t eating properly. I was depressed and couldn’t get out of bed some days. I wasn’t even doing my nails!
It’s times like these that we really need to learn to take a step back sometimes and take care of ourselves. If you ever find yourself in a moment where you feel overwhelmed or like there's too much going on, take a step back and breathe. Take time for you. Pamper yourself. Love yourself. Take yourself out to the movies. Take care of your body, mind, and soul. Make sure to do this every once in awhile, or blogging will start to feel like a burden.

BONUS 3: Don’t Stress About Perfection
One thing that I hear over and over from my clients is that they are waiting to publish their blog or blog posts until it’s perfect. NO!!! DO. NOT. DO. THIS.
Waiting to hit “Publish” until something is perfect is only going to throw you into a spiral of analysis paralysis and overanalyzing. You need to remember that “done” or “good” is always better than “perfect.” Nothing will ever be perfect, so just get comfortable with the idea that you can always go back and change something that you don’t like. Hell, I’ve changed my blog layout 5 or 6 times since I hit the publish button 3 years ago.
One last thing to note about perfection: The blogger to-do list is literally endless. There are ALWAYS things that you can work on, improve, or create. If you don’t get to everything on the list or all the things you “should be” doing (like being on social media constantly every day), don’t stress about it. Just do what you can to make things work.
The best advice is to end each day being able to say, “I did ONE thing today that is going to move my business forward.” Whether that’s posting a blog post, starting your email list, or outlining that new e-Course you want to create. Just know that everything will work out in the end as long as you do one thing each day.
Resources in this post:
My Travel + Blogging Resources Page (tons of FREE offers and deals!)
10 Common Blogging Mistakes You Should Avoid if You Want to Turn Your Blog into a Business
Adobe’s Creative Cloud Lightroom Photography Plan, $9.99/month
'Dreamy Presets' Lightroom Presets (10% off with code THECITYSIDEWALKS10)
Tailwind (Free 30-Day Trial with my link + $15 off!)
BoardBooster (Free 30-Day Trial with my link)
GetDPD (Free 30-Day Trial with my link)
What are other tips you have for your fellow bloggers? If you have any questions about blogging, feel free to comment below!

This page may include affiliate links, which comes at absolutely no cost to you. All proceeds go directly back into maintaining this website and making it better for you. All opinions are my own.
Similar Posts For You

How to Stay Productive While Traveling
If you have a job where you combine work + travel, you know that one of the most difficult things about traveling is having the skill to stay productive while you're on the road. Check out this guide with some of my best tips and tricks on how to focus and stay productive while traveling!
How to Stay Productive While Traveling
If you're an entrepreneur, blogger, or any other profession that requires work + travel, you know that one of the most difficult things about traveling is having the skill to stay productive while you're on the road. It's tricky to balance the time you need to be getting things done and staying on deadline with enjoying yourself and having a good time.
Being a full-time blogger and living part-time in 2 cities over the last year (on top of many other travels here and there) has made this a difficult challenge that I've had to learn to overcome. I've had to learn how to manage my day-to-day schedule (which is always changing and always crazy), stay on task with deadlines, and still make time for personal fun and things I want to do. Trust me--it's not easy!
It's taken me almost a full year to figure out a good formula that works for me, but I'm giving you some of my best tips and tricks today so that you can also learn how to focus and stay productive while traveling!
1. Have a Specific Daily Schedule or Routine You Keep To (*and do the things you hate most, first!)
After I quit the corporate world, I was sooo against having a daily routine. I didn't want to do it out of fear that I would get bored with the mundanity of day-to-day life again. However, when I was close to pulling out all of my hair because I was so unorganized, Jay kindly kept pushing the idea of me creating a special routine that incorporates all of the great, creative things I need to get done every day. ...And it freakin' worked!
I put together a daily schedule (hour-by-hour) that helps me keep on track with everything I need to get done. I always start the day out with the things I want to do least (like working out) or the things that will take the most brain power (like writing blog posts) so that I can get them out of the way. The rest of the day is blocked off into different chunks that allow me to get all of my other tasks done.
If you have a daily routine already set in place, this will help you organize your time for the next step.
2. Plan Ahead and Prioritize
If you know you're going to be traveling, plan ahead and prioritize your schedule. What does that look like for you? Maybe it's planning all of your blog posts ahead of time on an editorial calendar, scheduling your social media for the following week, or booking your meetings well before or after your trip. It could also be scheduling important projects ahead of time that you need to be in your home to complete (I focus WAY better when I'm at home in my personal space). It could even be as simple as cleaning your house or doing your laundry before you leave so you come home to a fresh space.
If I know I'm going on a trip, I block off the entire day(s) I'm traveling so that I don't book any meetings (it's more stress you can easily mitigate), and I make sure to get major projects done before I leave so that I can focus on tying loose ends while I'm on the road instead of creating a project from scratch. There's no need to create more stress during travel if you can just plan ahead and prioritize effectively.
3. Have a Go-To Packing List
I. LOATHE. PACKING. Oh my goodness. It might be one of my least favorite things about travel. But, it's helpful to have a go-to packing list that you refer to over and over so that you're ready to rock'n'roll when it comes time for your trip.
Know the basic things you need will almost always be: clothing, toiletries, and electronics. Break that down further into exactly what you have to bring and pack as quickly and efficiently as possible.
4. Use the Time on Your Flight Wisely
If you really want to make the most of your time during your travels, use the down-time on your flight to your advantage. While I 100% back the activity of sleeping on the plane (I typically do it for anxiety purposes), you can also use this time to get plenty of work done. You can get to those follow-up emails you've been needing to write; you can write a series of blog posts; you can edit pictures; you can plan out your weekly schedule; or you can listen to that business podcast or TED Talk you've been wanting to hear for a while. Don't waste your time on the flight if you really need to get things done!
5. Beat Jet Lag and Hit the Ground Running
Jet lag is a real thing and can affect even the most avid of travelers. Read this guide on how to effectively beat jet lag (without taking any pills or supplements) and take some tips on how to get going once you've arrived to your destination. It's really all about planning ahead, getting proper rest, staying super hydrated, and then hitting the ground running once you land.
6. Stick to Your Schedule
Once you've created your own daily schedule at home, make sure you stick to it when you're traveling! It's the best way you'll be able to stay on task just like you do at home. If you normally wake up at 7am for your workout, do your best to wake up at 7am for a workout when you're gone. If you do your creative tasks at 9am every day, do your creative tasks then. You can alter your schedule based on your situation, but at least you will have an idea of how the day should break down.
7. Keep a Healthy Lifestyle
One of the biggest things that will bring you down and keep you off the productive path while you're traveling is having an unhealthy lifestyle. I'm sure you're already aware of all the health benefits that come from these good tips, but make sure you're staying active every day, drinking lots of water, and eating balanced meals. Working out will give you the endorphins and positive energy to keep up your productivity; and healthy food and water will nourish your body and give it the fuel it needs to get everything done. You can definitely indulge a little, but just be careful you don't go overboard!
8. Invest in Travel-Friendly Electronics
If you want to keep your productivity up, consider investing in some travel-friendly electronics like a Wi-Fi Jetpack (~$50/month), a Mophie cell phone charging case, noise cancelling headphones, back-up batteries, small extension cords, or even wireless charging banks for your other electronics. None of these things are vital or necessary, but they definitely help for keeping efficiency up no matter where you are! *My Wi-Fi Jetpack has really come in handy at hotels or airports where the free connection is crap.
9. Make Time for Yourself
The most important thing on here is that you make sure to take time for yourself. It's great to stay productive and be getting things done, but like Ferris Bueller once said, "Life moves pretty fast. If you don't stop and look around once in awhile, you could miss it!" Always set aside time to enjoy yourself, relax, and explore the place you're traveling. It will give your brain some time to decompress and enjoy the little things so you're fresh and ready to go when it's time to start working again.
Are you good at staying productive while traveling? What tips do you use to make sure you stay on track? Comment below with more advice!

Similar Posts For You

How to Create an Editorial Calendar for Your Blog
As a blogger, creative, or entrepreneur, there are tons of things to juggle around on a day-to-day basis. It's time to get creative and plan ahead so the stress doesn't get overwhelming! Use this tutorial on how to create an Editorial Calendar for your blog so you can properly plan out your blog posts ahead of time.
How to Create an Editorial Calendar for Your Blog
If you're a blogger, creative, or entrepreneur, you'll feel me on this one... All the day-to-day tasks we need to get done just to keep our business moving is EXHAUSTING! Social media scheduling, blog posts, podcasts, outreach, promotion, product creation, graphic design, website maintenance, trainings and webinars... I mean, COME ON!
CONFESSION TIME: In the recent months, I've been so busy with other projects (all of which I'm eternally grateful for!) that I've had a hard time keeping up with regular entries on my blog. I was finding it increasingly more difficult to sit down and consistently write--whether that was because of my schedule or just a lack of inspiration on what I "should" write about.
A friend of mine, who had also gone through this same experience, suggested I create an Editorial Calendar to keep up with my posts. I sat down with my little planner (yes, I'm old school and actually love writing things down) and started chipping away at this Editorial Calendar. This simple tool has helped me tremendously in planning out my blog posts and scheduling when they will get done.
I'm so passionate about it that I've created a little tutorial for you to do the same! Here are 7 steps for you to create an Editorial Calendar for your blog:
STEP 1: Hone In On 3-5 Categories That You'll Write About
If you've watched my free Instagram Webinar, you already know about my "3-5 Sub Challenge." Yes, I know, it's not a sexy name; but it get's the job done!
The 3-5 Sub Challenge is basically where you pick 3-5 sub-categories of your overarching theme to your blog (or Instagram profile, if you were following the webinar) and hone in on them so that you can have a consistent flow. So start by picking out exactly what you want to write about. Maybe your categories will be (1) travel tips, (2) city guides, (3) restaurant recommendations, and (4) hotel recommendations.
The idea here is to get a rotation of categories that you can plug in throughout the week on your calendar so you're never confused about what topic you should cover next. Try to get as specific as you can!
STEP 2: Do a Brain Dump
Once you have your categories all laid out, it's time to do a brain dump! Brain dumps are one of my favorite creative exercises because they allow you to explore every nook and cranny of your brain to find ideas and inspiration for your projects.
Sit down with your notebook or computer in front of you and just start "dumping" (aka writing) away. Think of every possible blog post idea that you can that fits into the categories you just outlined. It doesn't matter if they are weird or if you never use them--write it down. Write every possible thing that comes to mind down.
If you need some inspiration, I always love to stalk Pinterest to see what articles stick out to me. It helps get those creative juices flowing and sparks new ideas. Write for at least 15-20 minutes--or more if you get on a roll! Ideally, you want to walk away with at least 20-30 new blog post ideas.
STEP 3: Commit to a Consistent Schedule
Once you've got your brain dump out of the way, you need to really have a talk with yourself and figure out what you can *realistically* commit to posting. Is it once per week? Twice per week? Twice per month? Whatever it is, commit to it and stick to it.
The worst thing you can do is be overzealous about how many times you want to post and then get let down or feel bad that you couldn't keep up (I'm guilty of this!). At the beginning of this year, my goal was to average 3 posts per week. But, as my schedule got busier, I could only commit to 1-2 posts per week--which is totally fine! Be realistic with yourself and commit to what you can actually do.
I'll also suggest committing to a consistent time of day when you actually write your posts. For me, I have to do them in the morning because that's when I have the most brain power. If I put them off until later, they won't get done. Figure out when the best time of day is for you and keep it in mind for Step 5.
STEP 4: Choose a Platform to Keep Your Calendar
A life coach once told me, "If it doesn't get scheduled, it doesn't get done." I believe this to be very true in my own experience. If something is in the calendar, it's more likely to get done versus if it's just in my regular "list of things to do."
After you've committed to your schedule, it's time to choose the platform where you want to keep track of everything. You basically have the options of paying nothing or investing a small monthly fee to use a robust scheduling service. Here are some options:
- Google Calendar (FREE, easy to use, syncs to your devices, color coordinate, & schedule recurring events)
- Excel (FREE, easy to use, you can upload it into a drive and read from other devices, lots of tabs, & color coordinate)
- Monthly Planner (for those of you who like to actually write things down!)
- Trello (Basic Plan is FREE, small-but-easy learning curve, can access via the cloud, & create multiple boards)
- CoSchedule (Paid Service, but very robust and efficient; you can schedule all of your social media through the platform or backend of your WP site)
I personally use my monthly planner since I like writing things down and having them in front of me, but the choice is yours!
STEP 5: Plug In Your Content to Your Calendar
Now that you've chosen your system, it's time to plug in all of your content to the calendar. This is exactly why we did the first 3 steps so that we know exactly what we are going to post about (the category), the blog post title, and the days/times we are going to post. Refer back to your journaling exercises and plug everything in accordingly! You can use schedule reminders, color coordinating tabs, and other things to help you out.
At this point, I would also recommend knowing what types of keywords you might want to highlight, what types of photographs you want to add, what types of calls to action you'll be including, and any other small details that will make the actual process of putting a blog post together much easier. You can write these things in the notes section where you schedule that day's post.
STEP 6: Constantly Be Adding to Your Brain Dump
Once you've got your Editorial Calendar all set up, remember to constantly be adding to your brain dump list. I have a list on the Notes App on my iPhone that I keep track of all my blog post ideas (it's literally titled "Blog Post Ideas"). Sometimes, ideas will just come to me in the middle of the day or while I'm out and about, so I have this place where I can go and constantly add ideas. Make sure that you're keeping something like this so that you're always coming up with fresh content.
STEP 7: Continue to Plug & Chug
Take a look at your Editorial Calendar every 2 weeks to make sure you're plugging and chugging away. Use your brain dump list, your category intervals from the 3-5 Sub Challenge, and your posting schedule. It's super easy once you have a system in place!
What are ways that you keep an Editorial Calendar or ways that you stay on top of your blog posts? Comment below! Would love to hear more suggestions!

Similar Posts For You

Home Accessories Every Traveler Should Have
Why wait until your next trip to get those amazing sensations of wanderlust? Bring your travels home with you and start incorporating new accessories into your space that can bring you back to your favorite places. Here are 14 home decor accessories that every traveler should have.
Home Accessories Every Traveler Should Have
If you're a fellow travel junkie like me, you understand the very real struggle of having wanderlust. It's almost as if your body is in constant need of adventure, travel, or exploring.
But you don't have to wait until your next trip to get those good feelings of travel running through your system. You can start feeling that travel bug every day if you wanted to! By "bringing the travel home with you," you can begin adding little things into your home decor to make you feel those sparks of wanderlust day in and day out.
The best way to do this is to start collecting beautiful pieces of decor while you're traveling to bring home with you. This can be books, kitchen supplies, furniture, accessories, or little trinkets. If you want to start with a baseline of products before you start incorporating more, here are 14 home accessories every traveler should have in their home!
Vintage Trunks
Great for extra storage and decor. You can also pick some up at a fabulous antique store!

Global Map Decor
Any decor that has either a map of the world or a map of your favorite destination is a great keepsake to have in your home.

Exotic Table
Try incorporating different styles of furniture throughout your home to give a cool, eclectic vibe. I love the look of these Moroccan tables.

City Maps
Having a unique map of your favorite city can be a daily reminder of that place and bring you those positive travel feelings.

Feng Shui Desk Accessories
If you work from home like I do, it's super important to have your space feel clutter free and zen. I love having little desk accessories like bamboo, a zen garden, or a mini gong.

Coffee Table Books
No travel-loving home is complete without a few unique coffee table books!

Cozy Blankets
Turn your home into a luxury 5-star hotel by adding in cozy blankets and bedding. You really can never have enough!

Moroccan Rug
Even though these rugs can be expensive, they are such a beautiful staple piece to have in any room of your house.

Antique Globe
No traveler's home is complete without at least 1 globe. (I have like 4 in my house...EEEP!)

Antique Compass
Having little accessories and knick knacks can help accentuate the travel vibe you want to give off in your home. Picking up a cool compass is a great way to do that.

Elephant Bookends
Elephant decor is really popular in some Asian cultures, and it's said to bring good luck, wisdom, and strength. It adds a beautiful touch to any home!

Funky Serving Platter
If you're a traveler and you love to entertain guests, be on the lookout for a fun, eclectic serving platter to have for events.

Rustic Mirror
Having lots of mirrors around your space can give the illusion that it's bigger than it actually is. Opt for having some rustic looking mirrors for that vintage/antique feel.

Eclectic Accent Tables
Depending on the size of your space, you can use these fun accent tables next to your couch or as a nightstand. They definitely offer a fun element to the room!

What are other travel-related home decor or accessories you love having in your house? Comment below with more suggestions!

Similar Posts For You

15 Free Blogging Tools Every Blogger Should Use
Just because you have a blog doesn't mean you need to spend a ton of money to make it successful. Here are 15 FREE resources that every blogger should be using that won't break the bank. From scheduling tools, to webinar platforms, to graphic design resources, we've got you covered!
15 Free Blogging Tools Every Blogger Should Use
One of the best things about blogging is that there are zero barrier to entry. If you want to be a blogger, you can buy a domain right now and get a website up and running in less than 24 hours if you wanted to.
But what about after you create the website? There's a lot of hidden expenses that people don't tell you about when you start--i.e. networking events, email systems, e-courses, designers, etc. It can really start to add up!
Luckily, there are still tons of great, free tools out there that bloggers and creatives can take advantage of so they aren't breaking the bank! I'm all about saving money and I've done some work to find the best blogging resources that won't cost me a penny. Here are 15 of my favorite FREE blogging tools that you should start using today if you aren't already.
1. Canva
I really don't know how I've lived my life without Canva. Canva is a free graphic design tool that allows you to create beautiful images and designs all on their web-based platform. You can drag and drop images, add text overlays, create presentations, produce infographics... Ugh! There is so much you can do with Canva. I know absolutely NOTHING about graphic design, but Canva makes it look like I do. They even have templates with set dimensions for different types of graphics, or you can customize your own!
If you take away 1 blogging tool from this list, let it be Canva.
2. QuickTime Player
For those of you who need to make a simple video, a screen flow, or record something from your mobile device, look no further than QuickTime Player. QuickTime Player is a free tool that's already included on Mac computers, and is easy to download on other PCs or computers. It's really easy to use and the quality of the image is great.
I actually created my entire Instagram E-Course using QuickTime Player because I didn't want to have to pay the money for other programs that did screen flows (aka a video of what is happening on your computer screen). It was super easy and efficient and I recommend this free tool for anyone who needs to do those types of videos. *You can even plug your mobile device in and record a screen flow from there!
3. Gmail
In case you've been living under a rock, Gmail is a wonderful email system to use for people of all ages. While I do believe that you should eventually get an email address with your proper domain (yourname@yourwebsite.com), there is absolutely nothing wrong with starting out with a regular yourwebsite@gmail.com email address. You can set it up in seconds and it's very user friendly.
Once you start to get more serious with your blog, you can upgrade to the 'Gmail for Work' suite of products, which is just a small monthly fee. I actually still use both addresses.
4. Google Drive, Docs, Calendar, etc.
Along with your Gmail account, you will get access to the entire Google Suite of products: Google Drive, Docs, Calendar, etc. All of these tools are super useful when it comes to your blogging business. Google Drive is awesome because it allows you to easily store, share, and upload information, pictures, documents, or downloads; Google Drive makes it easy to create and share Word Documents on their web-based platform; and Google Calendar can integrate seamlessly with your smartphone so you can always keep up to date. Definitely take advantage of these products with your account!
5. License-Free Stock Photo Websites
For those of you who didn't necessarily come from a background in media, it might be worth noting that taking images straight off the internet can lead to pretty serious repercussions if not done carefully. Laws these days are pretty strict when it comes to intellectual property and it would be really sucky to find yourself in a situation where you're faced with a lawsuit because you grabbed a picture that someone else owned.
To avoid this issue, use license-free photos from websites like:
- StockSnap.io
- Pexels
- Pixabay
- Creative Commons
- Flickr -- Just make sure it is the Creative Commons License and you're allowed to use it
- PicJumbo
- LifeofPix
- Negative Space
When you're browsing these sites, most of them don't require any sort of attribution...but it's always good to double check! Usually photos from Flickr require a small attribution, so always read up on the details.
6. Google Hangouts On Air
Bloggers hosting webinars is a big thing right now. When I first began hosting my webinar on Instagram, I spent hours trying to find the right webinar platform to use. I kept seeing a ton of different platforms that were familiar, but they were all so expensive! Since it was my first time, I didn't want to dish out the money and invest in something that I wasn't sure I was going to do again.
Luckily, I stumbled upon a blog post about webinars that said Google Hangouts On Air was a great FREE alternative to use. Plus, it's already included in your Gmail package! It was super easy to use once I messed around with it for a little bit. You can share your screen, share a live link with your audience, embed it into your website, and even send a replay of your webinar afterwards since the broadcast automatically records ands saves to YouTube. It's a wonderful alternative for people who want to do webinars while saving a little money.
7. Skype
If you don't have a Skype account right now, go sign up. Skype is a great way to be able to connect with people worldwide at any time. I've had job interviews, stayed in touch with friends, and even helped some of my blogging students via meetings on Skype. It's a great communication tool to have as a blogger--especially if you're a digital nomad or frequent traveler.
8. Hootsuite or Buffer
If you want to add a little more time into your week, or you just hate constantly updating your social media, consider using a social media scheduling tool like Hootsuite or Buffer. You can connect your social accounts to their platform and schedule out your social media for days in advance. Both platforms offer free options, but there are also paid options if you have multiple accounts to juggle around (good for Virtual Assistants or Social Media Managers).
9. Google Analytics
Any blogger who is serious about their blog should have a Google Analytics account. It's the industry standard to report your blog's statistics, demographics, and analytics. It doesn't take too long to set up and is really important to know if you want to get partnerships of any sort down the road.
10. Google Keyword Planner
SEO has become quite the buzz word with bloggers in recent years. Maybe you're wondering, "What's a good way to improve SEO?" Plan ahead! Google Keyword Planner is an awesome free tool that's included with your Google account and it allows you to see what words are receiving great traction on the internet.
For instance, if you're going to write a blog post about healthy desserts, you can use the keyword planner to figure out what your best combination of keywords should be according to Google's stats. When you go to write your post, you can try to strategically include those keywords throughout your post as best as possible for good results. Voila--your blog post is now more SEO friendly!
11. Dropbox
Another alternative to Google Drive is Dropbox, which is a great way to share and transfer files with other people. Their initial plan is free, but you can upgrade your storage plan for a small monthly fee if you need to.
12. Evernote
For those of you who'd like to have a place where you can take notes and keep track of your projects, check out Evernote as an option. While I personally prefer the old fashioned way of pencil and paper, a lot of people love Evernote for it's user friendly interface and cloud integration. Their free plan offers a limited amount of storage, but you can easily upgrade if you need more for your account.
13. Paypal
As far as payment systems go, Paypal is far from perfect...but it's easy to use and it's free to get an account. For people who need to set up a payment system--whether you're offering coaching services or even receiving payments for partnerships--Paypal is a good system to have. It's a global platform on only takes a few minutes to set up and link to your bank account.
14. Placeit
Placeit is a really interesting creative tool I recently discovered. It allows you to take an image and place it into a mockup on a smartphone, computer, or tablet. It's great for people who have an e-book, a PDF download, an e-course, or anything else that you want to show off how it would look on a screen. You can download the smaller images for free, or purchase really large ones if you need for a small fee.
15. Mailchimp
If you're just starting out as a blogger and looking to keep costs low, I recommend using Mailchimp as you build your email list. The interface is pretty easy to use and set up, and it's free up until a certain amount of subscribers. Once you're ready to take your blog to the next level, there are other email platforms that might suit your needs better, but Mailchimp is a good place to start so you at least have something in place without spending a ton of money.
BONUS: FREE Resources, Guides, E-books
There are tons of websites and bloggers out there who offer free resources, guides, downloads, e-books, trainings, etc. that you should ALWAYS take advantage of! It's free! Why not? Usually all you have to do is exchange your email address for the downloads, so it's worth checking out for tidbits of information that can help you take your blog to the next level. HINT: You can sign up for The City Sidewalks' Free Resource Library RIGHT HERE! I also offer free trainings and other special goodies to my subscribers :)
What other free tools do you recommend or use? Comment below with more resources that bloggers can take advantage of!

Similar Posts For You

Instagram Mistakes That Can Hurt Your Profile
How often do you check your social media to see if there are improvements you can make? Make sure you aren't making these 5 common Instagram mistakes that could be hurting your profile.
Instagram Mistakes That Can Hurt Your Profile: 5 Mistakes to Avoid if You Want to Create a Successful Profile
How often do you check your social media to see if there are improvements you can make?
Is it daily? Weekly? Monthly? Maybe never?
As you may have read in my past Instagram articles, you have two-tenths of a second to WOW someone when they come to your profile before they click away forever. You want to make sure that your content is top notch in order to get them to stay around!
I've recently been helping fellow creatives get on track with their Instagram strategy and I kept seeing 5 common things that have been detrimental to their IG profiles. I'm sharing these 5 mistakes with you now so you can avoid them and optimize your Instagram profile.
*PS: You can watch my FREE INSTAGRAM WEBINAR by clicking RIGHT HERE!
Mistake 1: Over-Editing Your Photos
I think we've all been guilty of this at one point or another (I definitely have), but over-editing your photos is a huge no-no if you're trying to get more engagement on your posts. The biggest culprit? Too much saturation.
Basically...Don't over-edit your photos. Keep it simple and clean. People prefer this over heavy filters or too much unnatural color. A good trick if you're lost is to take a look at how larger accounts are editing their photos and see how they match up to yours. With a little practice, you'll be a pro in no time!
Mistake 2: No Clear Theme
The biggest reason why someone will click away from a profile is that there is no consistency or clear theme to the profile. Maybe the pictures are all over the place, or maybe they don't match the expectations listed in the bio (or even the IG name itself).
Solution? Pick 1 overarching theme to your profile, select 3 to 5 sub-categories under that theme, and post only those types of images. If it doesn't match, don't post it. You can do this until you feel like you've got a good groove of consistency going.
Mistake 3: No Call to Action in the Bio
Instagram has become more of a "brand builder" than a product pusher in recent months. People connect with your brand on IG, fall in love with you, and then interact with your brand offline.
Sooo... How do you make sure you capture those people once they leave IG? Make sure you always have your website or some kind of URL in your bio that they can refer back to. It doesn't have to be your blog; it can be your YouTube channel, your opt in page, or even a link to your Etsy store. Whatever it is, just make sure it leads people to where you want them to go.
*Pro tip: Use bit.ly to shorten your links so you don't have a massive jumble of characters in your bio.
Mistake 4: Including Your Watermark, Logo, or really any text on the photo
Time to throw a little harsh honesty in here... Watermarks, logos, and text over a photo is extremely distracting and Instagram users typically don't like it. Instagram is a visual platform and people want it to be kept that way.
Another harsh reality: If someone wants to take your photo, they will. Unfortunately, in this day and age, there is really little that can be done to protect property like that. People can easily just screenshot the photo and crop your watermark out; so just don't include it in the first place. It takes away from the natural beauty of the photo.
Are there exceptions to the rule? Of course. There always are. But generally speaking, having watermarks, logos, and text overlay is very distracting.
Mistake 5: Not Interacting with Others
The final "no-no" on this list is thinking that Instagram is a place where you don't need to play with others in order to grow your presence, your engagement, or your brand.
With Instagram's new algorithm, engagement is going to be the #1 priority for people who are trying to grow their brand on Instagram. You need to make sure you're interacting with other people on IG in order to do this. Respond to people who comment on your pics, show them love back, follow them back; reach out to new people who have similar interests as you and comment on or like their pics.
There are so many ways to get involved, so make sure you're doing doing something! If you're confused, my Instagram E-Course for bloggers, brands and creatives will help guide you to creating a successful Instagram profile so you can get paid for your passion (and it's on pre-sale right now for $59!).
What other Instagram mistakes do you see or struggle with? Comment below with more tips!
If you're a blogger, brand, or creative, you can sign up for a FREE 15-minute consultation with me today! Just fill out this form here:
Want to learn how to get paid for your passion on Instagram and start making money with the following you already have?
My Instagram E-Course for bloggers, brands, and creatives will show you the way.
JUST CLICK HERE FOR MORE INFO!
JOIN ME ON INSTAGRAM @THECITYSIDEWALKS


Similar Posts for You

10 Common Blogging Mistakes You Should Avoid If You Want to Turn Your Blog Into a Business
Turning your blog into a business is a bit more complex than people think, but it can also be really fun and rewarding. If you want to turn your blog into a business, make sure you avoid these 10 common mistakes so you can pave the way for success!
10 Common Blogging Mistakes You Should Avoid If You Want to Turn Your Blog Into a Business
Blogging as a career is so much more than just opening up your laptop, typing up some articles, and snapping a couple pictures here and there. If you want to turn your blog into a business, there are crucial steps you need to take to make sure that you pave the way for success.
Let me just say this: Turning your blog into a business is a bit more complex than people think, but it can also be really fun and rewarding. The feeling you get when you make your first dollar from your blog is unforgettable. It's your baby and YOU created it!
I've observed some of the things that make a successful blogger, and observed some of things that make and unsuccessful blogger. I've made A TONNNNN of mistakes in my blogging career, and a lot of them have set me back some time in my success...but hey! That's life! Live it, learn it! I'm here to share those common blogging mistakes so that you can avoid them and save some time by learning from my mistakes.

Mistake #1: Paying Attention to the Noise Around You
Ok, so this one can have 2 meanings. I'm talking about (1) the people in the beginning who will try and talk you out of starting a blog or make you doubt your decision, and (2) the other bloggers who claim to have the secret formula to success for turning your blog into a 6-figure empire overnight (UGH. STOP WITH THIS SHIT!).
Listen up: If you want to start a blog, DO IT! I've even mapped out an easy 5-step process for you right here. Don't let someone talk you down or make you question whether or not you should do it. Trust your gut instinct and go with it! What's the worst that can happen? You decide you don't like it and move on? Ok! **Before I started TCS, someone I once knew tried to talk me out of it by saying, "blogs weren't relevant anymore." BOY, AM I GLAD I DIDN'T TAKE THAT ADVICE!
There are a lot of bloggers and coaches out there who are trying to hook in other bloggers to buy into their "formula for 6-figure success" these days. You guys... Don't fall into the trap of listening to the noise around you. Making 6-figures in any business takes a lot of hard work, dedication, passion, and time. THIS is the TRUE formula: Put your head down and grind it the f*ck out. **PS-Check out this incredible post from byRegina.com that exposes this phenomenon of the 6-figure trap.
Mistake #2: Not Writing Constantly in the Beginning
Oh boy, did I learn this one the hard way... When you start a blog, you must write prolifically in the beginning. Seriously! Pump out as much crap as you can. And I say "crap" because that is probably what it will be. CRAP.
My goodness...I look at the stuff I posted when I first started and I want to claw my eyes out! It's horrible! But that's the reason you need to write constantly so that you can put the bad stuff behind you and make improvements fast. It will help you find your voice and it will get you in the routine of putting out quality content. The more you do it, the better you will become.
Mistake #3: Not Starting an Email List or Creating an Opt-In
You know all those social media followers you have? 10K on Instagram, 5K on Facebook, 20K on Twitter... Guess what? They could be gone tomorrow. Legally speaking, you do not own your social media followers. But do you know what you DO own? Your email list.
If you haven't done so already, start an email list! Even if you only send 1 newsletter of your blog post roundups, start it now! Open an account with an email provider (Mailchimp, ConvertKit, Aweber, etc.) and get rolling. I waited until late in the game to start building my email list and it's one of my biggest mistakes. Lesson learned!
The best way to grow your email list is to create some sort of opt-in or freebie that people can get when they sign up. Even if you put together a nice, professional looking, 1-page checklist that people can get value out of when they sign up, that is better than nothing. There are so many "sign up for my newsletter" messages out there that you want to stand out from the rest. Create something of value to give away to your audience FOR FREE.
Mistake #4: Waiting Until Your Blog is "Perfect" to Publish It
Are you in the process of designing your blog, playing around with the layout, or messing with it until it's perfect? STOP! Don't wait until it is "perfect" to hit publish because that doesn't exist. As long as you have the basic info (About Page, Social Media Links, & Blog/Home Page) that's all you need to start! Don't even worry about having tons of blog posts up. Just do it now or you'll get analysis paralysis.
I've probably gone through over 10+ different designs of TCS since I started it, and I'm STILL changing things all the time! It's never going to be perfect. You'll like it for a bit, and then want to change something. So don't waste time waiting for perfection. Just get yourself out there now and start at it!
Mistake #5: Not Utilizing Pinterest
You know what my #1 traffic referral is? Pinterest. Yes, Pinterest. And by a massive landslide too. The platform that we all kind of overlooked turns out to be the biggest referral generator for me and tons of other bloggers.
You want to grow your blog and your traffic fast? Get on Pinterest. I grew my traffic over 800% in 2 months just by putting my content on Pinterest. Here's the easy step-by-step to start now:
- Set up a Pinterest Business Account with your blog's name
- Create a solid profile that includes a picture of your face (or logo if you're a biz) and type up a strong bio with great keywords peppered in
- Use Canva (or other similar programs) to create Pinterest-length pins that will act as the cover to your blog posts
- Upload those custom pins you just created and link your blog posts to them
- Create relevant boards for your blog and pin to those boards
- Join group boards to participate in and pin your content to those boards too
It takes a little work, but the results are sooo worth it. You can join me on Pinterest here!
Mistake #6: Playing the Comparison Game
Confession: This might be the #1 mistake I've made as an entrepreneur. There are so many other people in this space that it is extremely easy to look to the left or the right and find someone to compare yourself to. Not to mention all the bloggers right now who are putting out income reports to expose how much money they have made.
It can be really discouraging to a new blogger--or even veteran blogger--to look at all this stuff that's happening around you and feel like you don't measure up! You see someone else's blog and how good it looks, or you see this person's accomplishments and awards, or maybe this blogger's claim to making $100K their first year of blogging. It can be a REAL heavy shot to the self esteem and creative drive. I'm saying this because I've been through it!
You CANNOT play the comparison game. Comparison is the DEATH of creativity. The best thing you can do is put your head down and focus on you and what makes you happy. Stop focusing on what other bloggers are doing and look to yourself. That is their journey, not yours! The best thing I've done to battle this (yes, I still struggle with it sometimes) is to be selective with what you put your focus into. Focus on creating, not comparing.
Mistake #7: Thinking Your Blog Will Go From 0 to 10K Views Overnight
I get an eye twitch every time a brand new blogger posts on a Facebook group that they just started 1 month ago and only have 100 views on their blog. Reality check: that is to be expected! You just started your blog and 100 views is so great! You should be celebrating, not feeling discouraged (Are you playing the comparison game? Is that why you're discouraged?!).
I wish that I could tell you that your blog will become an instant overnight success; but unless you're a celebrity and just getting into blogging, that probably won't be the case. Getting your blog to grow is going to take time and effort. Be patient, put out awesome content, and the followers will come. I promise.
Mistake #8: Not Joining Affiliate Programs
If you want to turn your blog into a business, why not start by generating some passive income from it? Join some simple affiliate programs from the get-go just to get you started. Amazon Affiliates is a great place to start (every time you recommend an Amazon product and back-link it with your code, you make a commission if someone buys it). Share-A-Sale and Commission Junction are other ones. The list really goes on and on! Point being: join some kind of affiliate program to at least get you started.
Mistake #9: Not Being True to Yourself
You know what stands out amongst a sea of Internet content? Authenticity. Authenticity always wins over anything else. People can easily sniff out the garbage or imposters, so make sure you're being true to yourself and putting out content that is honest and really makes you happy. Don't post about things you "think your audience would like." Nah, post about the stuff that really matters to you.
Being true to yourself is the most important thing and it will attract the genuine followers. The minute I started writing as if I was chatting it up with my best friend was the minute my blog started taking off. Let your personality and voice shine through (*kudos to John Romaniello for giving me this incredible tip of advice). People notice and appreciate it.
Mistake #10: Not Providing Value or Creating Trust With Your Audience
Do you know why someone would choose to come back to a blog again and again and again? It's because that blog continuously provides a tremendous amount of value that people can't wait to consume. Are you doing this in your business? What are you doing right now to provide value and create trust amongst your audience? Do you have amazing *FREE* content that they can come and consume time and time again?
The secret to being a successful blogger is to create and establish a trusting relationship with your audience. Once your audience trusts the stuff you're putting out and you've created a ton of value, they are more likely to buy into the stuff or services you have to offer. Provide value, create trust, and repeat. Once you do this enough, you'll have a loyal following behind you that is eager to consume and promote your content for you.
_____
What are other blogging hurdles you've overcome in your quest to become an online entrepreneur? Comment below with feedback or other tips for people to create a successful blogging business!
_____
If you're looking for additional help to set up your blog or business, I offer all new clients a FREE 15-minute consultation! Please use the form below to contact with me with questions.
Similar Posts For You

How to Prepare for the New Instagram Algorithm
Instagram is shaking things up and changing the algorithm to favor engagement. Don't panic just yet. Adjust and adapt! Here are 4 steps to prepare for the "New Instagram" as it rolls out to make sure you don't get lost in the shuffle.
How to Prepare for the New Instagram Algorithm
Did you hear the news?! Instagram announced it is rolling out a new algorithm and it's all about engagement! Everything is going to be different! EVERYONE PANIC!!!
Ok... Seriously... Don't panic.
Change is the only constant in life, so we shouldn't be surprised that this is happening. When the announcement was made a couple months ago, everyone got all up in arms that Instagram was losing its cool, messing things up, and even becoming irrelevant. Trust me: the change didn't make me happy either; but I learned that if I wanted to keep using IG (which I love and heavily rely on for my business), I would have to learn to adapt and prepare for what's coming.
At the end of the day, Instagram is a business. If they want to change things up, we just have to suck it up, adapt, and move on. Do I like all the (sometimes horrible) changes some social media platforms have made over the years? HELLLLL NO! But I learn and find ways to modify what I'm currently doing in order to be successful for what is to come. That's our job as entrepreneurs!
It's like all the times Facebook has changed things up on us (Why, FB?! Whyyy?). We all effing hate it, but we adjust and proceed. Well, it's time to adjust and proceed, everyone! The New Instagram Algorithm is here and we might as well do what we can to prepare for it. Here are 4 steps you can use to prepare for the "New Instagram."
Step 1: Rebuild Your Foundation
The new IG is all about engagement, right? Well, here's the secret... None of that matters if you're not starting out with a solid foundation to begin with. So the first step is to rebuild your foundation. What do I mean by that? Assess what the heck you're doing with your profile and make sure it is top level.
Check out this post with steps to creating an unforgettable profile, or just see the abridged version here:
- Have an easy-to-find name: Instagram's search capabilities are a lot stronger than we think, so make sure your name is easy to read, easy to find, and easy to type. No crazy characters, emojis, or other jumbled up things like using the number 0 instead of the letter O.
- Use a killer profile picture: This is what everyone will see as a representation of you whenever they open up Instagram. Make it professional, have your face in it, and be cohesive with the rest of your content.
- Create an informational bio: Your bio is like your welcome mat, so make sure you provide good-to-know information in there so people know what you're all about and what to expect from your profile. ALWAYS include a URL or call to action!
- Develop an AMAZING cover story: Make sure your photos are cohesive with your theme, you're using the same editing techniques, and you're not straying off topic. You can read more about how to create a stellar cover story here in this post.
Step 2: Optimize Your Posts
If you want people to engage with your content, you need to give them something to talk about. There are millions of people around the world uploading content to Instagram every day, so how are you standing out? Are you doing simple things within your posts to encourage and enhance engagement? Optimize your posts with everything you can in order to get people talking!
Confused on how to make that happen? Here you go:
- Have f'ing awesome content: If you're not putting out stellar content, why would someone want to engage with you? Make sure you are posting consistent and cohesive content that your audience will enjoy. Evoke emotions whenever possible, or use simple photography techniques like the rule of thirds. Try out new angles of things that people have never seen before.
- Carefully craft your captions: Successful captions get user engagement, so don't overlook your captions! Guide the people into doing what you want them to do. Throw in things or calls to action like "comment below," "tag a friend," "click the link in my bio," or "like this pic" to encourage engagement. Don't have your caption be an afterthought! Use it to your advantage.
- Use targeted add-ons: In my lingo, targeted add-ons are anything that you can add on to the post that doesn't actually include the picture/video itself. Hashtags, geotags, @ mentions, tagging someone in the photo, sharing to other social platforms, etc. It increases your exposure and gets more eyeballs on your content, which is obvi what you want at the end of the day. Use them, and use them often. FYI: Just using 1 hashtag can increase your engagement 12.6%!
- BE CONSISTENT: Listen up! If you only take away 1 thing from this blog post, let it be this. Be. Consistent. Consistency is the key to success. Use the same editing techniques, the same style of photos, and don't stray away from your niche. If you're a food blogger, stick to food blogging content. Don't confuse your audience. ABC: Always be consistent.
Step 3: Take the First Step to Engagement
Did you know that you hold the key to increasing your engagement in your hands? I'm dead serious. A lot of people think that Instagram is all about sitting back and waiting for other people to engage with the awesome content that they are putting out, but really it starts with you. You can't just sit back and wait for people to come and discover your profile. You need to start being proactive about engaging with others in order to get your name out there.
Think of Instagram like a giant networking event. You wouldn't sit back and wait for people to come to you. You get out of your comfort zone and meet others first! Here are some ways to jumpstart your engagement:
- People within your reach: Whether you're an established entrepreneur or just starting out, you already have people within reach that you can start to engage with on Instagram. Do your clients, Facebook friends, or other social media followers know where to find you on IG? Make it apparent. Start by letting them know that the party is over on IG and connect with people who are easy to access--aka get the low hanging fruit.
- Accounts in your niche: This is where people don't want to put in the work to see results. You have to put yourself out there first in order to get the people to come back to you. Find accounts in your niche--whether that is through FB groups, hashtags, the Explore tab, geotags, or other forms of searching--and get involved with them. Like their stuff, comment on their pics, follow them, etc. Take some time to give support to others and they will return the favor to you!
- Your IG audience: What are you doing to maintain the trust and engagement of your current followers? Reward the people who already follow you by showing them that you appreciate the support. Comment back to their comments on your content, like their content, follow them, do a shout out and repost their stuff, etc. Share the love and keep them engaged!
- Practice Daily Habits: None of these things are a one-and-done deal. You have to practice good daily habits every day in order to see results with engagement. Read more about the daily habits you should keep on this post.
Step 4: Don't Give Up On Instagram!
A lot of hearts were breaking across the world when Instagram announced the new algorithm, myself included. I don't think the feed should change at all, but we can't give up on Instagram just because we are frustrated with it! All we need to do is adapt and readjust. I promise we'll all get through this together and come out the other end successful. If you take these steps, you're definitely heading in the right direction to prepare for the New Instagram.
Want more Instagram tips? Sign up for my FREE Instagram workshop with the link below! You'll walk away with:
A better understanding of WHY engagement is so important (it's not all about followers)
3 actionable steps to start boosting your engagement today
Bonus goodies (including a video replay) at the end to refer back to after the training!
Want to learn how to get paid for your passion on Instagram and start making money with the following you already have?
My Instagram E-Course for bloggers, brands, and creatives will show you the way.
JUST CLICK HERE FOR MORE INFO!

Join me on Instagram @thecitysidewalks
SIMILAR POSTS FOR YOU

What To Do After A Blogging Conference: 6 Steps to Ensure Success
Blogging conferences can be an integral part of the growth to a digital entrepreneur’s business. With these 6 post-conference steps, you can be sure that you'll be making the most of your time at the conference, get everything done to grow your business, and do it all stress-free!
What To Do After A Blogging Conference: 6 Steps to Ensure Success
Blogging conferences are becoming increasingly more popular within the digital world, and have really become an integral part of the growth to a digital entrepreneur’s business. It’s a time when us bloggers can step away from the computers and cameras and come face-to-face with other people to network and learn vital information for our businesses.
The Women in Travel Summit just came to a close last week and it got me thinking... There is so much incredible information to learn and people to meet that it can become extremely overwhelming. How can you manage the stress in a positive way and be sure that you are making the most of your time at the conference?
I’ve been to enough conferences now--and even suffered through that information overwhelm--that I’ve learned the secret recipe to post-conference success. With these steps, I can assure that you’ll be making the most of your time, absorbing all of the information, putting everything to good use, and staying in touch with the people you interacted with. Keep this guide handy for your next conference!
1. Decompress
Unless you are an extreme extrovert, networking conferences can be extremely exhausting and overwhelming. You're meeting new people, getting business contacts, learning new information... It's a lot to handle! It can take a lot of energy to constantly be "on" throughout the conference, and you need to give your body time to decompress and relax afterwards.
It's important to allow yourself at least 1 evening (or day, morning, afternoon, whatever you want!) to kick back and chill post-conference. It basically lets the juices in your head marinate, if you will, and you'll feel much more refreshed and ready to go once you allow yourself to decompress a little bit. For example, if a conference ends in the afternoon, I will usually go home and order food, have a glass of wine, and maybe cuddle up on the couch with some Netflix for the evening. That way, I can just chill out and be ready to hit the ground running in the morning. It's so important to listen to your body and let it relax!
2. Organize your business cards/contacts
Once you've decompressed, open up your bag and pull out all of the business cards and contacts that you collected throughout the conference. If you're thinking ahead, you've probably already organized them all in the same spot so they aren't scattered amongst your things. *I learned this the hard way and now I bring a small ziplock bag to put all of the cards I collect so I don't lose any!
Organize your new contacts however you prefer--in a binder, on excel, in a rolodex, etc.--and maybe even start making little notes about each interaction you had. Maybe you talked to Sally about a sponsorship opportunity and you remembered that you spoke about her 2 daughters. Those are nice little things to include and remember if you want (definitely not necessary though). Start creating a small to-do list from your new contacts so that you know who you need to contact for what and save it for later.
3. Organize your notes
Now that you're in the organizing mood, start going through your notes you took over the weekend. If you attended some awesome lectures, seminars, or sessions, maybe you have some killer notes that you want to review. Organize those notes however you prefer--in excel, Google Drive, etc.--and feel free to reach out to your peers and do a note swap!
All of this organizing is leading up to something big--I promise!
4. Create an action item list
Here we go! Now that you're all organized--your business cards and contacts are in place, your notes are looking good, and everything is feeling right--it's time to put all of this into action. You're going to create a nice, neat, and compartmentalized action item list. Choose your preferred method of how you want to draft up this to-do list. I love physically writing it down, but a lot of people like digitally creating lists. Whatever works!
For all of those new contacts you neatly organized, you're going to create a column of all the follow-ups you need to do (i.e. Thank You's, sponsorship deals, intros, scheduling, etc.) and put due dates next to them. Robin Sharma once told me, "If it doesn't get scheduled, it doesn't get done." So schedule it into your calendar so you can get it done!
Once you're done combing through your contacts, look at the notes you put together to draft another action column. There's usually a reason why you took those notes. Are you trying to rebrand and create a better message for your audience? Are you starting to dabble in video content? Are you implementing some new writing skills? Look at the common theme amongst your notes to figure out what you are trying to accomplish. From there, create a detailed and very specific action item list for those things you want to accomplish (you can even create multiple columns if you need). The more detailed, the better! And don't forget to include deadlines to hold yourself accountable!
5. Execute
Now that you have your handy action item list, it's time to execute. You've included deadlines and due dates for everything you want to do, so you're already halfway there! Just follow through on the things that you promised yourself and execute every column on your list. You can do it!
2016 WITS Planning Team
6. Stay in touch
Staying in touch with people that you met at these conferences is one of the best parts of attending a blogging conference. It's so important to maintain these relationships because you never know what could happen down the road! Business opportunities could arise, new friendships could blossom, or maybe you could be traveling to a new city and someone you met at the conference lives there and could give you great advice (or a place to sleep!). Plus, it's so easy to stay in touch now with social media. Lots of conferences even have private Facebook groups that you can join before attending so you can connect with people that way. Whichever method you prefer to stay in touch, just make sure you do so.
What are your favorite networking conferences? Do you use similar methods to ensure post-conference success? Comment below with your opinions!
_____
*All images are from JasonSeagle.com from the Women In Travel Summit 2016 in Irvine, CA
SIMILAR POSTS FOR YOU

7 Instagram Shortcuts to Start Using Today
Handling multiple social media channels at once can be exhausting, so it helps to know a few efficient tips. Become an Instagram master (and maybe even put a little more time back in your day...) by implementing these 7 Instagram shortcuts into your daily repertoire.
7 Instagram Shortcuts to Start Using Today
If you have a blog, brand, or business that you are trying to promote on social media, it can be exhausting trying to handle all of those different accounts at once. You might as well know a couple shortcuts here and there to help you become more efficient and put a little more time back in your day. Here are 7 great Instagram shortcuts to add to your repertoire today!
*PS: You can watch my FREE INSTAGRAM TRAINING by clicking RIGHT HERE!
1. Create a Hashtag Keyboard Shortcut
Instagram recently changed their hashtag algorithms so that the most recent photos show closer to the top. It used to be that you could just go back and add a hashtag to a picture whenever you wanted and it would be added to the top of the feed; but now, if you want to increase your chances of getting exposure faster, you need to add those hashtags immediately when you post. So it's very important to know which hashtags to include right away--especially if you want to use a series of them!
One way to include all of those hashtags you want in a matter of seconds is by creating a keyboard shortcut so that you can easily type in one word or phrase and have all of your hashtags pop up. Follow these steps below to create your keyboard shortcut on your iPhone:
- Click on "Settings" on the main home screen
- Click "General"
- Click "Keyboard"
- Click "Text Replacement" and the "+" button at the top
- Enter your hashtags into the "Phrase" line
- Enter your shortcut name in the "Shortcut" line and click "Save"
- Open Instagram and select the photo you want to add the hashtags to
- Type your hashtag shortcut into your caption or into a comment


2. Suggested Follow
The suggested follow feature isn't a new one, but it's a great tool to use if you want to find and follow similar accounts to the ones you already enjoy. Just click the drop down arrow next to the "Following" button and you'll instantly see other similar accounts!
3. Hold & Explore
A great shortcut on the "Explore" tab (or on a profile) is the ability to look at a picture on the full screen without clicking out of the tab. All you have to do is select the picture you want to look at, press and hold down, and then swipe up to have additional functions.


4. Manage Your Filters
If you like using the preset filters on Instagram, you can move them around to put your favorite ones closer to the beginning. All you do is press and hold down the filter you want to move, drag it to the spot you want, and drop it. You can also drag the ones you don't want to the center of the screen and delete them if you'd like.


5. Send a Post
If you come across a post that you like and want to send it to a friend, you can use the steps in Shortcut #3 to select the photo and then click "Send as Message". Type in your friend's name and your message, and then click "Send".


6. Link to Your Social
If you haven't linked your other social media accounts to your Instagram profile, do it now. This is especially important if you are a blog, brand, or business and trying to grow your presence on multiple platforms. Follow the following steps to link your accounts:
- Go to your IG profile and click the "Settings" gear on the upper right hand corner
- Scroll down to "Linked Accounts"
- Select the social account that you would like to attach
- Enter your verifications into the prompts
- *For Facebook: You can select whether you want to share to your "Timeline" or "Page" (Select "Page" if you want it to push to your blog, brand, or business' account)
- Select the social account you want to push to when you're uploading your photo


7. Add Your Location Later
One of last year's updates made it possible to include a location on your post after you have already published it. It used to be that you had to be near the actual location to have it show up on the Geotag, but now you can be half way across the world and still tag something from your vacation last summer in Europe. Follow these steps to add your location later:
- Select your photo and click the drop down arrow on the upper right hand corner
- Click "Edit"
- Click "Add Location..."
- Enter your location and click "Save"


_____
What are other Instagram shortcuts you love? Comment below with other great tips!
Want to learn how to get paid for your passion on Instagram and start making money with the following you already have?
My Instagram E-Course for bloggers, brands, and creatives will show you the way.
JUST CLICK HERE FOR MORE INFO!

*PS: You can watch my FREE INSTAGRAM TRAINING by clicking RIGHT HERE!
SIMILAR POSTS FOR YOU
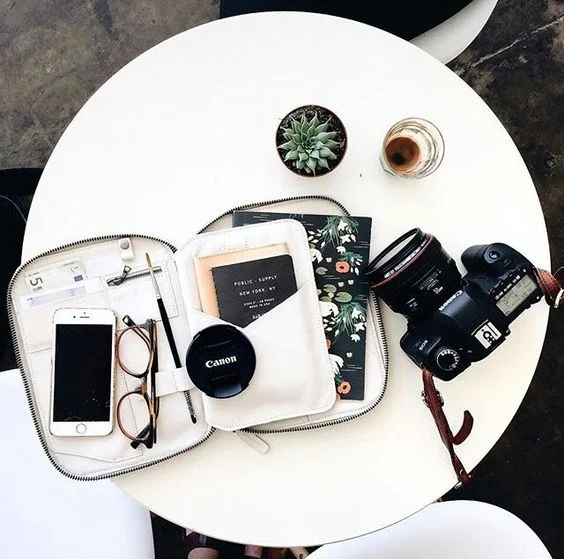
How to Create a Cohesive Instagram Feed
Having a cohesive Instagram feed is one of the key elements to growing your Instagram following. If you have a beautiful and consistent cover story, people will be more likely to follow you. Here are 5 steps to creating a cohesive Instagram feed so you can quickly build your audience.
How to Create a Cohesive Instagram Feed:
5 Steps to Having a Consistent Cover Story So You Can Quickly Grow Your Following
Did you know that it takes two-tenths of a second for someone to decide whether or not they will follow you on social media? That means you have less than 1 second to "WOW" a new visitor into hitting that follow button.
Do you think your profile has what it takes? In this article, we'll uncover how to create a cohesive Instagram feed by making sure your cover story is consistent and beautiful so that you can quickly grow your following!
*PS: You can watch my FREE INSTAGRAM TRAINING by clicking RIGHT HERE!
What is a cover story and why is it important?
Creating a cohesive and consistent cover story is one of the key elements to having a successful Instagram account. Your cover story--a.k.a. the first 9 photos of your IG profile--is essentially your brand's first impression, what gets people in the door, and what keeps 'em there. It's what gets people interested and engaged with your Instagram profile, and what makes new visitors want to follow you.
People love consistency, and this is especially true on social media. Having a consistent cover story is incredibly important for anyone who is serious about growing their Instagram following. Not only does it give off the first impression to any new visitors, but it continues to keep people interested as they start to follow your account. Post 1 inconsistent or bad picture and it could turn off your followers...or worse...make them unfollow you.
5 Steps to Creating a Cohesive Cover Story
1. Take Great Photos
Probably the most obvious step to having an amazing cover story is taking great photos. Make sure that every photo you take is visually pleasing and engaging. You can follow some of these simple photography rules to make sure your photos stand out from the crowd:
- Take multiple shots to have variations to choose from. Move around, shoot vertically and horizontally, get different angles, etc.
- Practice the rule of thirds
- Consider the composition and framing of the photo
- Select a subject and try out variations with it in the middle or off center
*Bonus points for pictures that stir up emotions (especially those of happiness)!
2. Be Consistent
Being consistent with your Instagram photos is extremely important to having a cohesive feed. Make sure you are consistent with each of these things at all times :
- You color palette. Pick a color palette and stick with it. Bright, dark, contrasted, etc. Just stick to it.
- Your editing technique. Use the same (or similar) editing process for all of your photos so they all look consistent. *I like using VSCO and Snapseed for all of my photos.
- Your layout. Make sure you have the same layout for all of your photos. If you're going to do a white frame on one photo, you have to do it on all of them. Same goes for photos in landscape or portrait frames so that they all look cohesive on your feed.
- Your theme. Pick a theme and make sure your photos go with it. You can try to choose 3-5 different types of images that all fit within that theme and alternate between posting those photos. Example: You have a food blog and you post 1) food pics, 2) restaurant interiors, 3) selfies of you eating the food and/or hanging at the restaurant, and 4) ingredients to make food.
3. Match Your Photos to Your Bio's Expectations
Use the space you have in your bio to set up expectations for what your followers can expect from you. If you say that you are a fashion blogger posting about street style, don't post a random photo of your little cousin's birthday party or a frog that you saw outside your window. It just doesn't make sense and it doesn't go with the flow. Yes, those pictures might be nice; but if you're trying to create a cohesive profile, stick to what you said you would in your bio.
4. Tell Your Story
Use your feed to tell your brand's story. It is your opportunity to use visuals to convey your message and story to your followers. Choose a theme and editing style that can align well with your brand's story and keep with it. Maybe you're a travel blogger who loves sharing pictures from the places you travel, so you share those colorful images. Or maybe you're a bike rental company and you want to show off how much people love (and look good) riding your bikes, so you share simple and beautiful images of people enjoying the bikes. Get creative with it and have fun!
5. Grow It Frequently
If you've gone through this article and feel disappointed that your Instagram feed isn't where you want it to be, don't worry! The best thing you can do to create a cohesive IG feed is to grow it frequently. Have a consistent posting schedule that you stick to every day (or week) and always be adding to your feed. You can always try and test out new ways that work best for you, but just make sure you are growing your feed frequently and being consistent with how often you post.
_____
Growing your Instagram feed can take time; but once you start practicing these tips, you'll start creating a feed that will undoubtedly make people want to join in on your journey.
Just remember to be consistent and always be growing!
Want to learn how to get paid for your passion on Instagram and start making money with the following you already have?
My Instagram E-Course for bloggers, brands, and creatives will show you the way.
Just click here for more info!

*PS: You can watch my FREE INSTAGRAM TRAINING by clicking RIGHT HERE!
SIMILAR POSTS FOR YOU

Hi, I'm Ana Rebeca! Welcome to The City Sidewalks. Here you’ll find tips on Travel, Lifestyle, and Wellness.
AS SEEN IN:


FOLLOW ON INSTAGRAM